53. How to make a great Action Bar in UE5
There are two parts to making this action bar and this is part 1. Next one is adding drag and drop functionality to the skill/action bar.
In this post we will be creating a new skill book and configuring the action bar to be able to use and activate the skills.
To recap, in the last few posts we:
- Created a basic mob AI
- Created basic mob anim blueprint
- Implemented basic combat validation for player
So now we have very simple combat between player and mob, we want to start adding skills.
Part of this, we want to have a skill book and an action bar.
The skills themselves will be stored/actioned on a custom server. However this is not required for you.
For reference, the UI assets that I will be using in this post come from HONETi.
You do not need to use the same UI kit – we will be focusing on the logic of the blueprints.
Defining a Skill (Struct)
We’re not going to need ALL of the parameters of the skill at this post, however they will become useful as we progress.
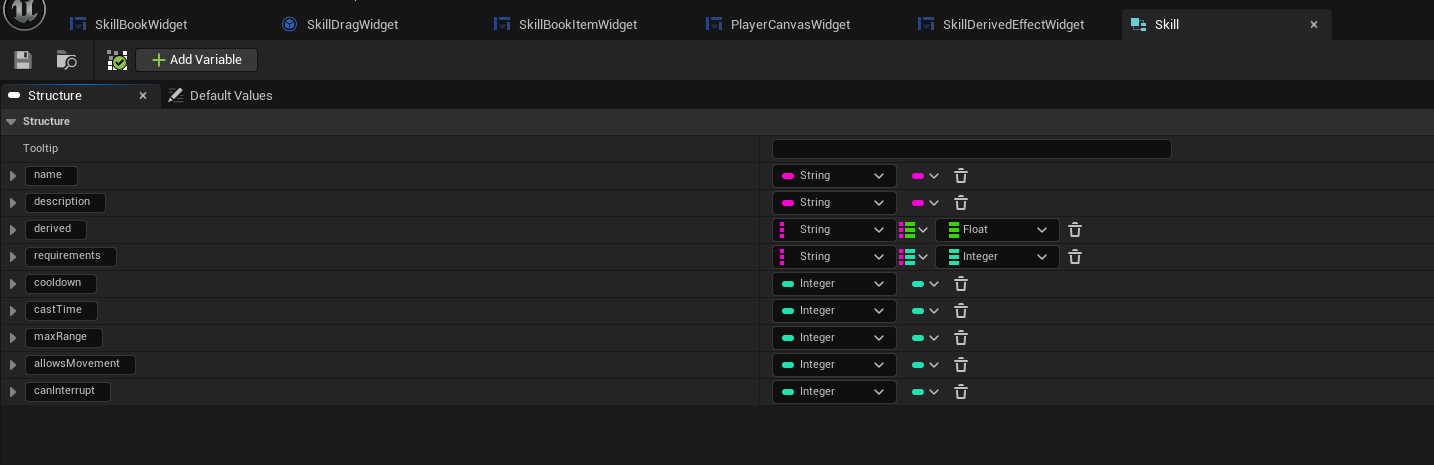
The key details we need here are:
- Name
- Description
- Derived (Skill effects)
Other parameters will be useful when we start implementing the skill actions, so are out of scope in this post.
As you can see, the skill Icon is not part of this struct, so we will need a way of obtaining that skill icon.
You can add another property to this struct, Skill ID, but I decided to re-use name instead (ID should be better!).
I created a new Struct which will be used for Data Table to store the Skill Icon.
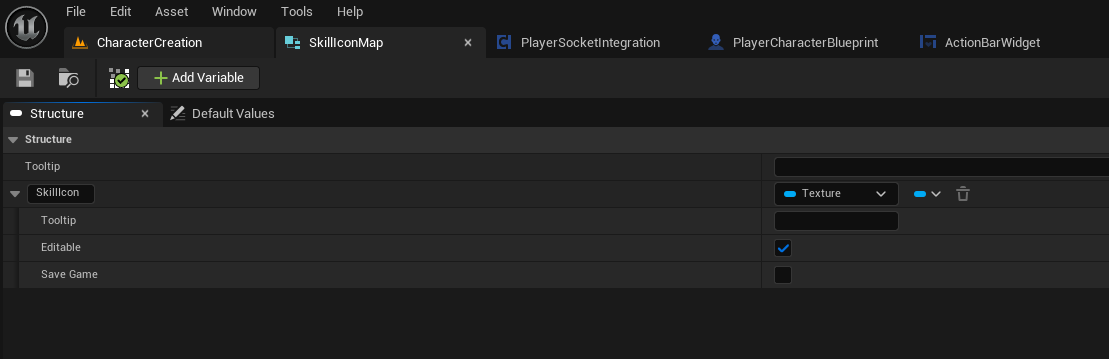
As you can see, it only has 1 parameter, SkillIcon, which is a Texture class.
In order to create a Data Table, right click in your content browser and under Miscellaneous you will find Data Table.
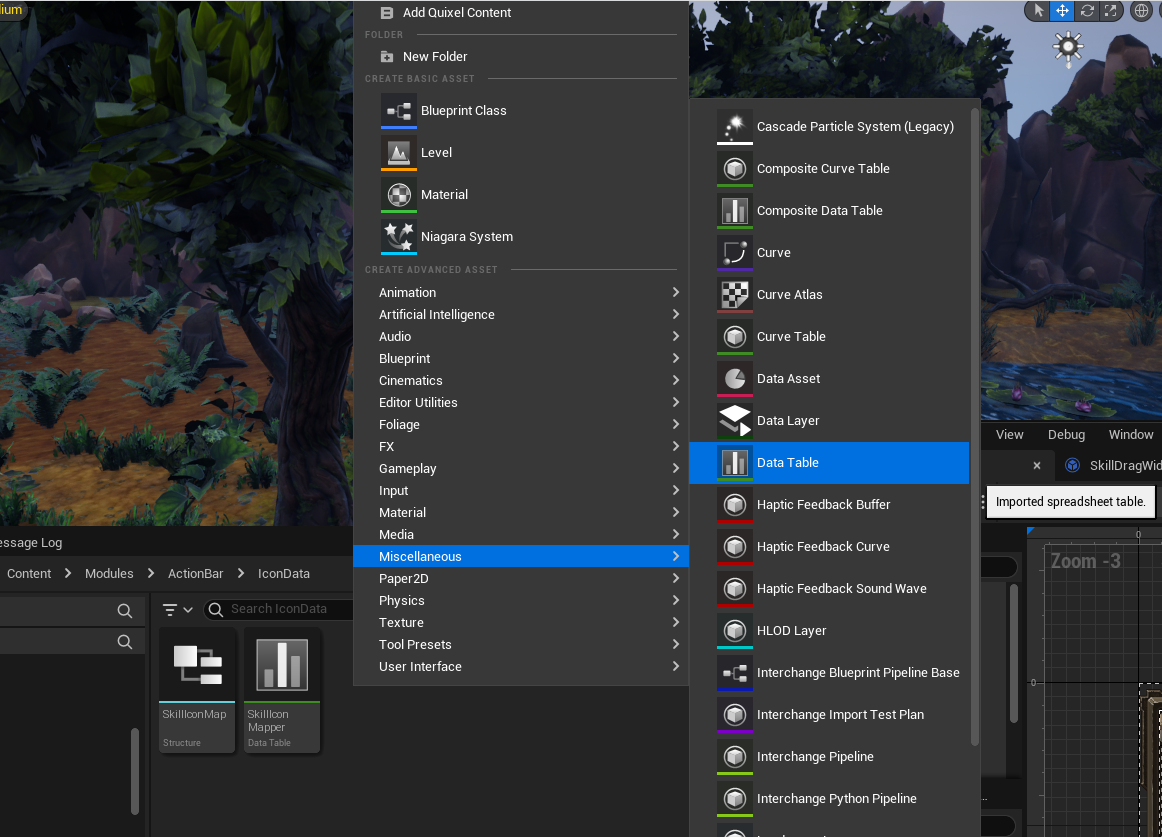
For the row type, select the struct we created earlier, SkillIconMap or whatever you called it.
Now you will be able to start populating the details inside.
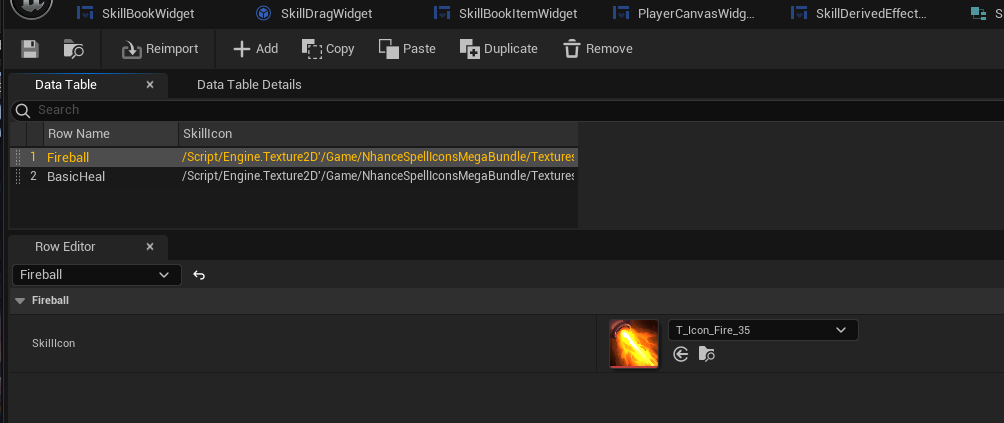
Row name will be the skill ID and the Skill Icon should point to the desired icon texture.
Now we prepared the Skill structures and how to obtain the icons for them.
Creating skill book widget
The skill book itself will consist of 3 main widgets:
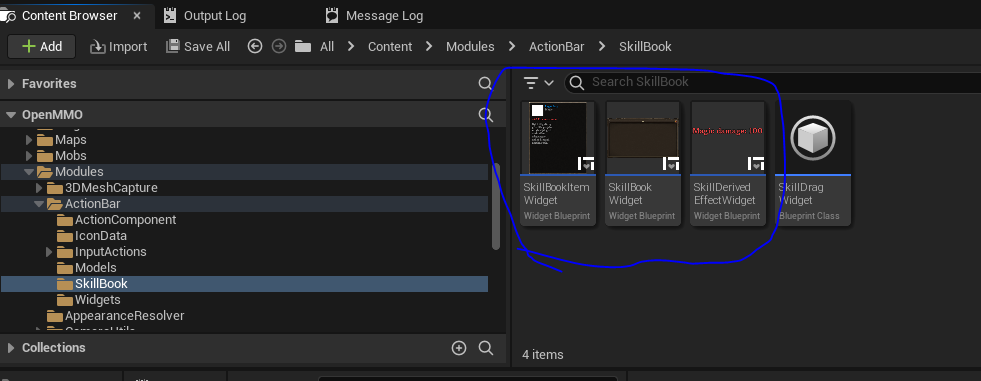
- Skill Book
- Skill Book Item
- Derived Effects for the skill
The Book itself will contain one to many skills. Each skill can have one to many derived effects. That’s why its broken down in such a way, so we can dynamically create and populate these values.
Let’s begin with the Skill Book Item first, which is the definition of the skill itself.
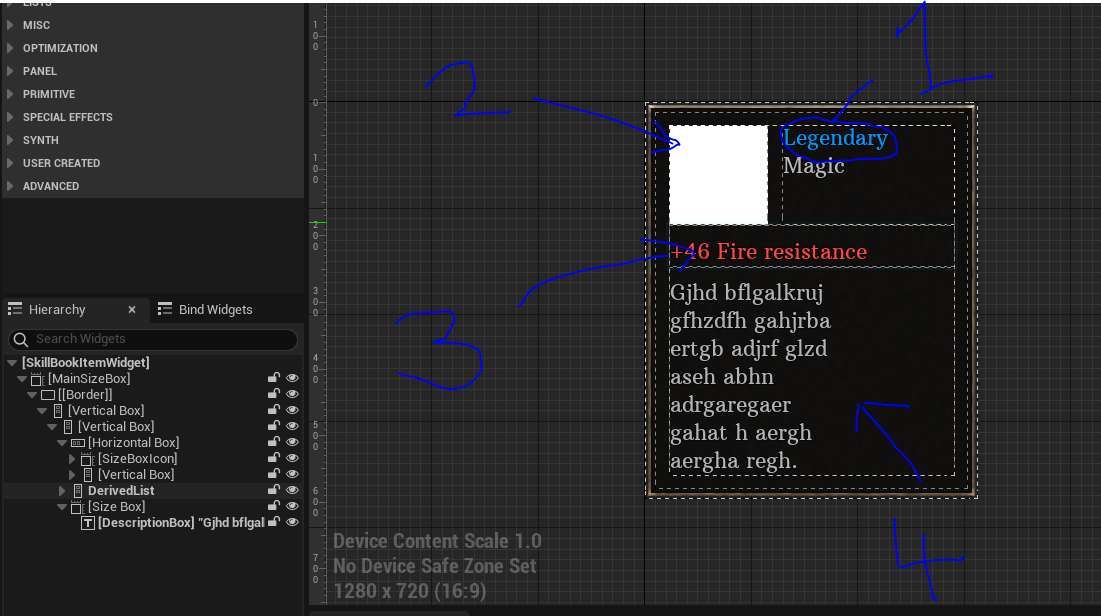
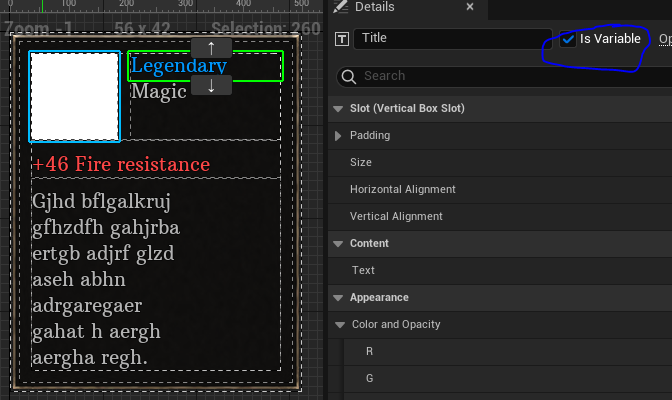
There are 4 main properties that we want to see and populate here.
- Skill name
- Skill Icon
- Derived effects for the skill
- Description
There’s multiple ways of doing this, I linked it to constructor but you can make a direct binding to the parameters.
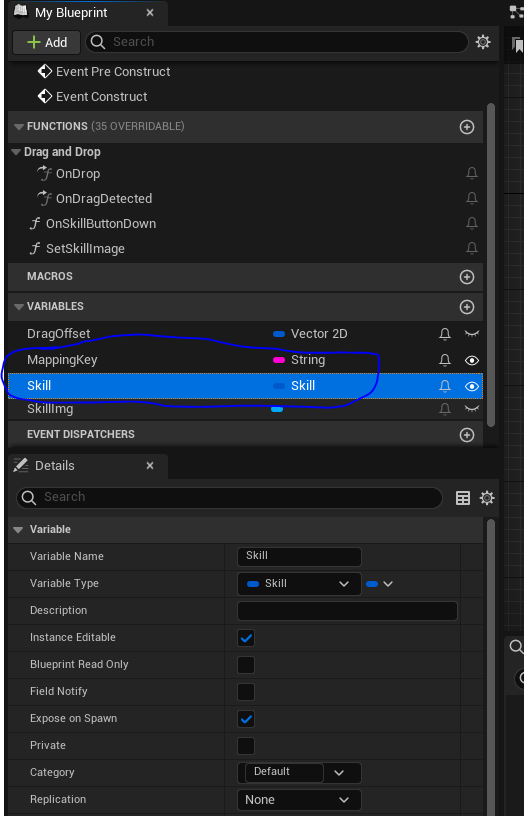
First important part is to add a new Skill variable in and make it Instance Editable and Expose on Spawn.
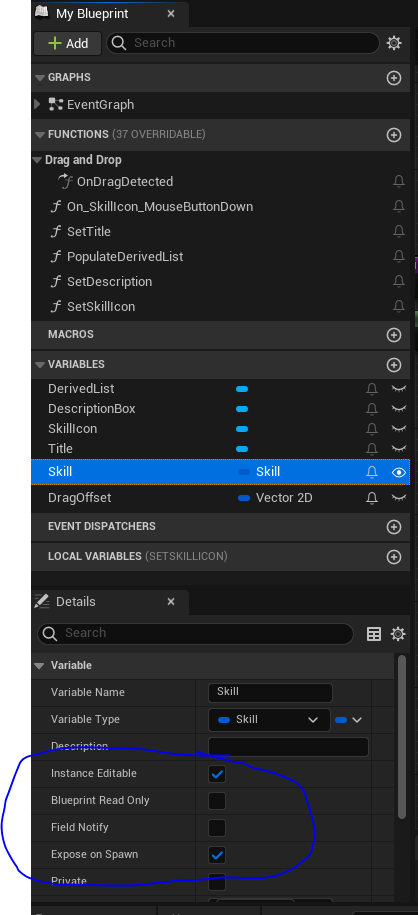
Also, the components in question should be set to ‘Is Variable’ in the designer.
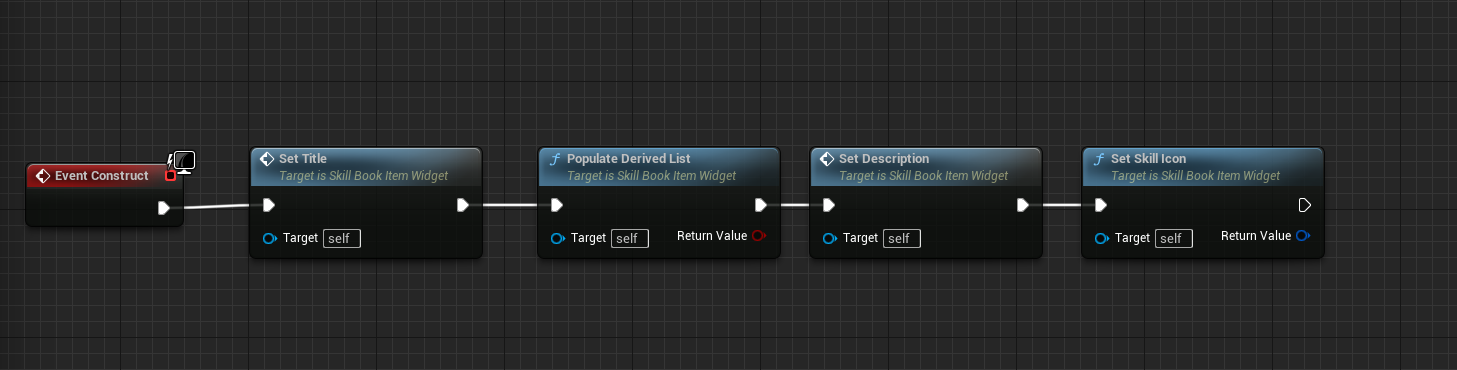
Now let’s see how we populate these parameters.
Functions for the Skill Book Item
Set Skill Title:
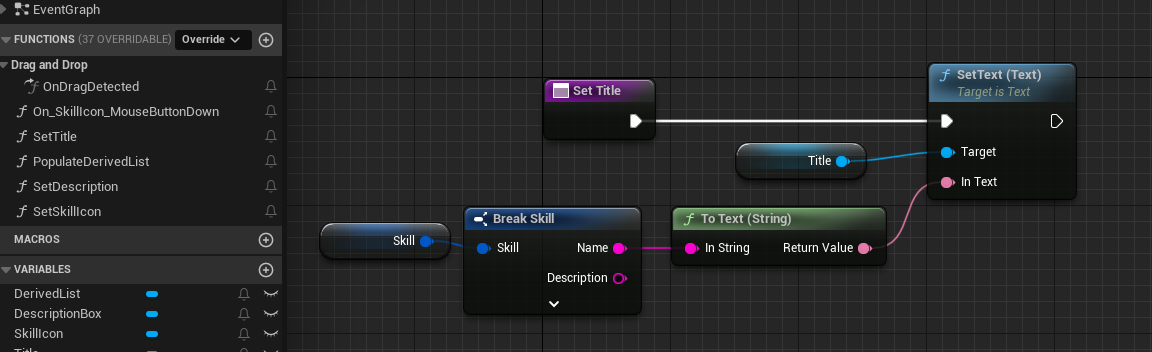
We simply extract the name variable from Skill and assign it to Title.
Set Description:
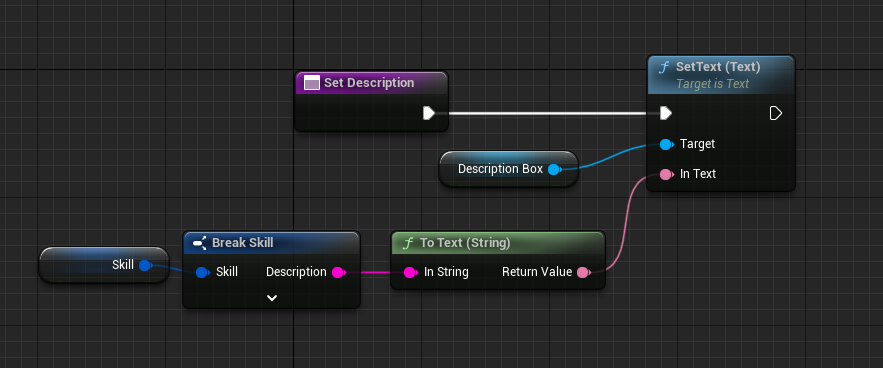
In a very similar fashion, grab the description from Skill and assign to the description box.
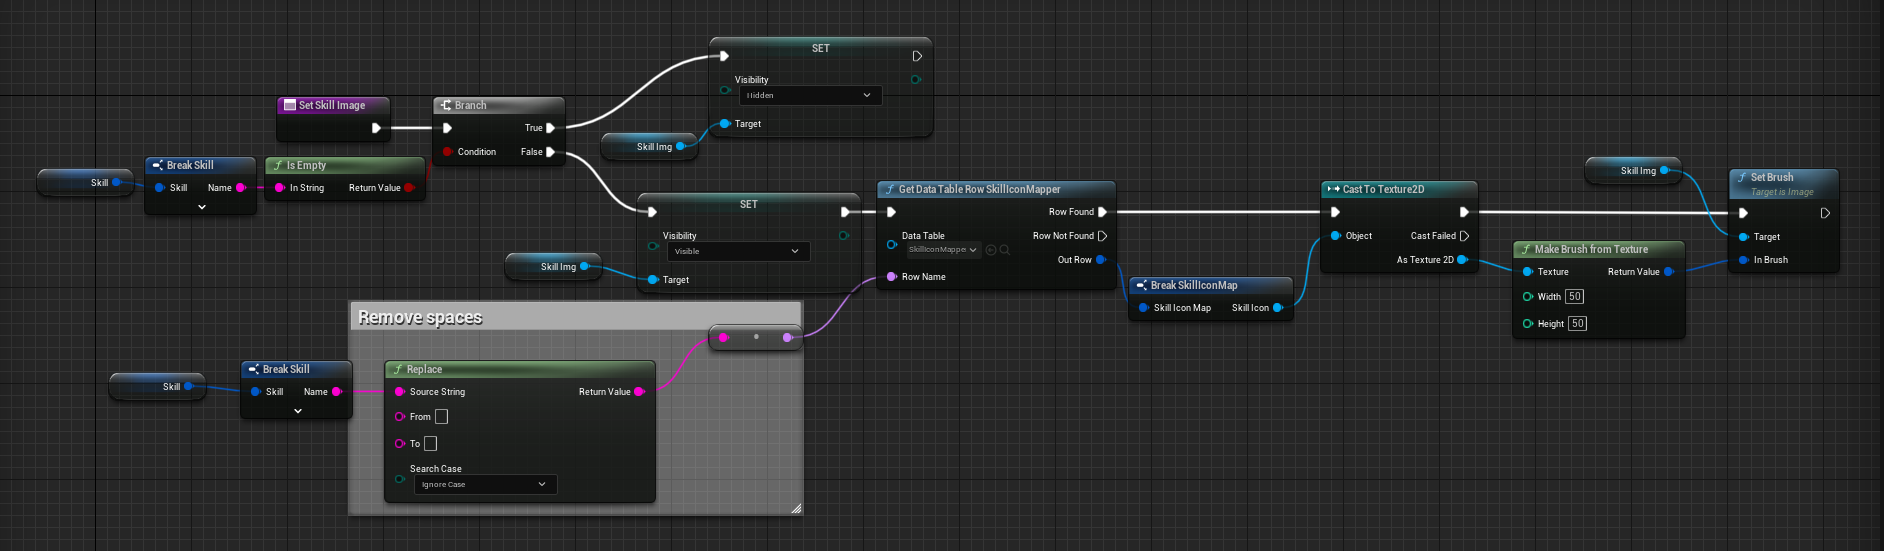
Get Skill Icon:
This one get’s a little more interesting, we want to grab the skill icon from the data table that we created earlier.
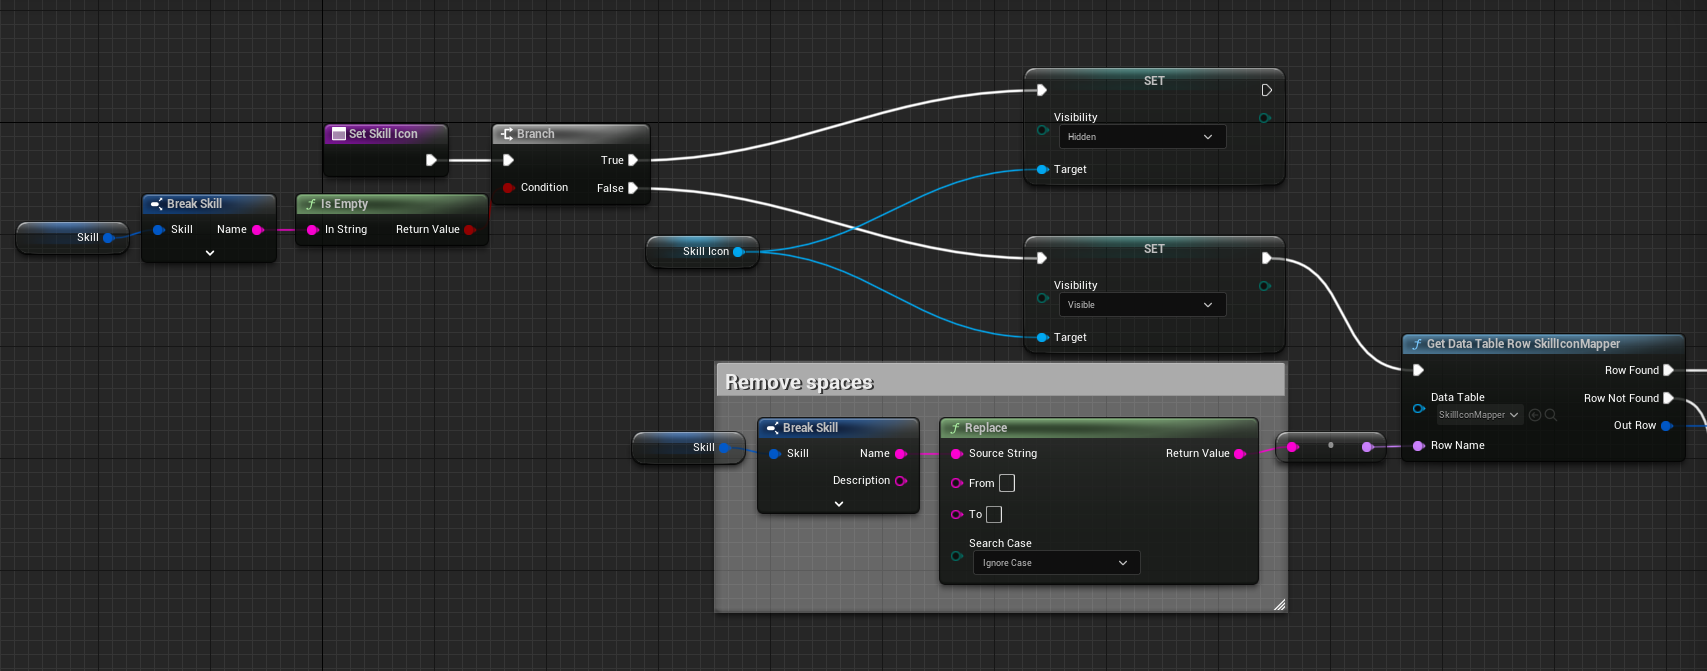
Bear in mind the name in my skills can contain spaces, so you can see ‘Replace’ block which removes spaces.
This is why adding ID to struct may be better for you.
Here I grab the Skill object and check whether the Skill name is populated, if not, we hide the icon, but this is unlikely scenario for skill book, and you may want to log the output.
If we have the skill name, we Get Data Table Row SkillIconMapper which should return us the row of data containing the skill icon to use.
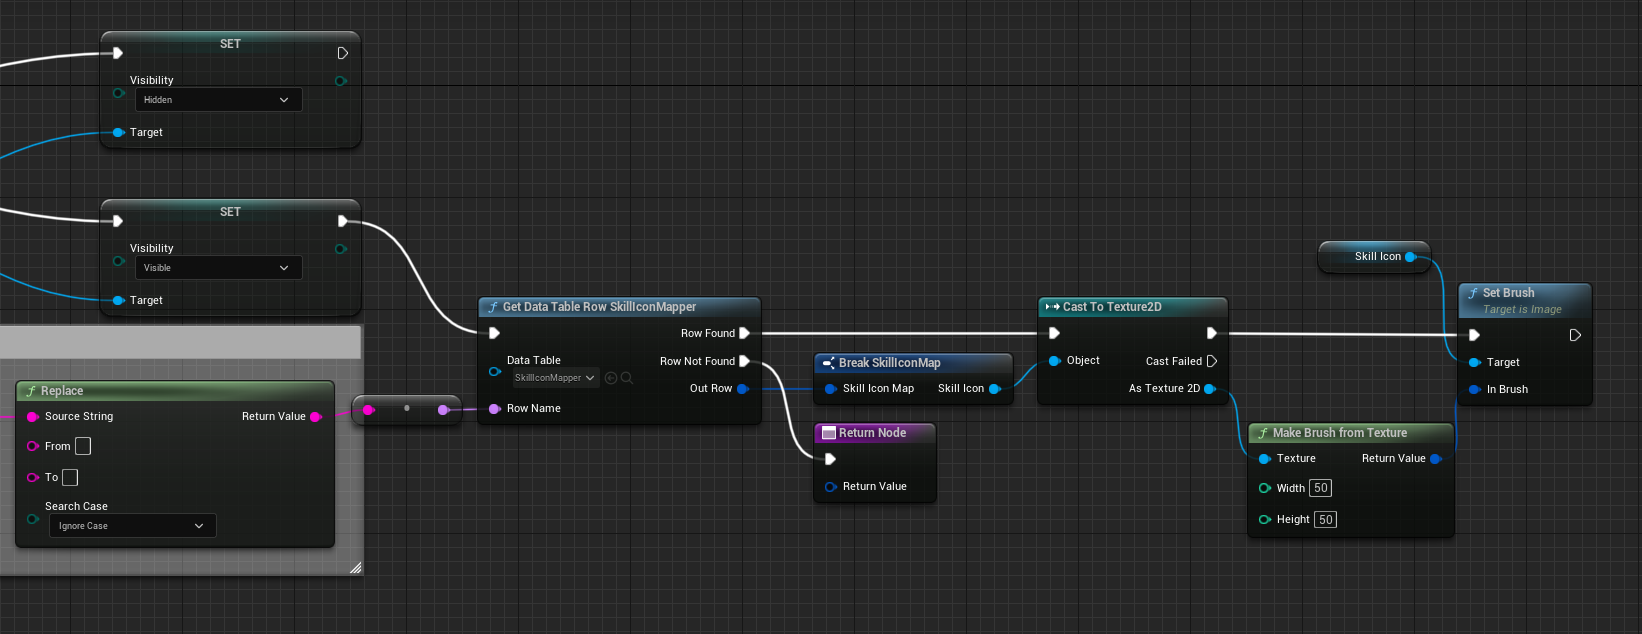
After we obtain the icon, we set brush using the texture directly, or we can make brush using texture which will allow us to set width/height. These dimensions will be used later when we enable drag and drop.
Populating the derived effects
Some skills may have multiple effects, such as fireball could do magic damage and add burning effect.
To handle adding multiple effects, we have a Map<String, Double> structure, where the key defined the effect name and the value defines the amount.
Here’s how we call the Populate Derived List function.
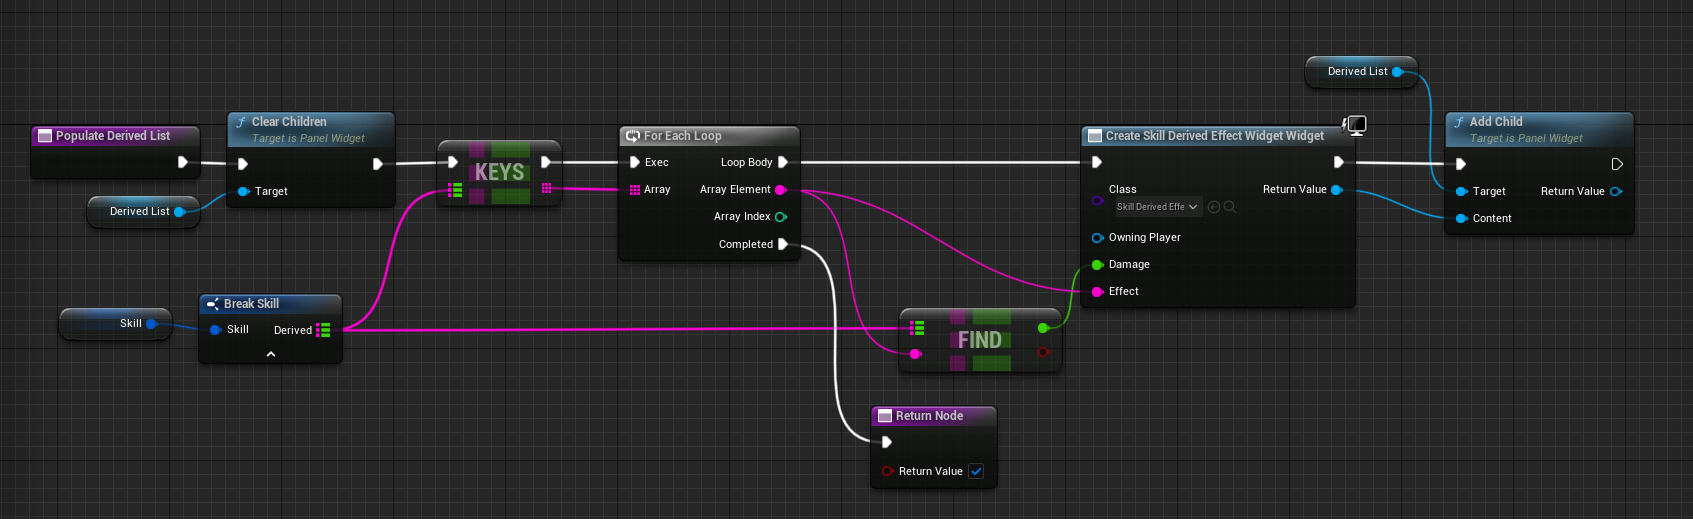
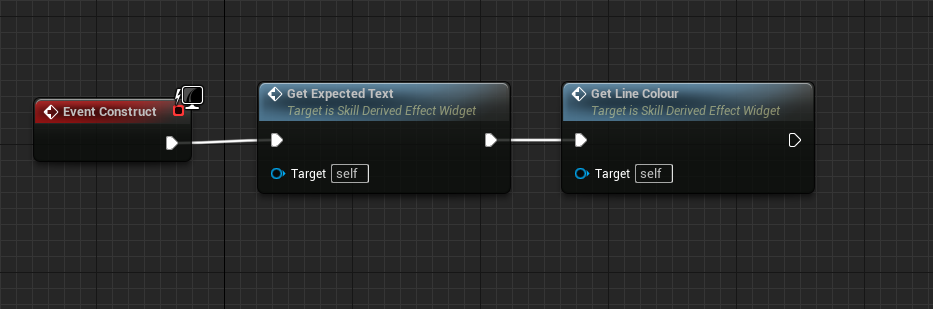
We will explore the Skill Derived Effect Widget shortly, but before that, let’s not forget to call these functions on the widget constructor.
Skill Derived Effects Widget
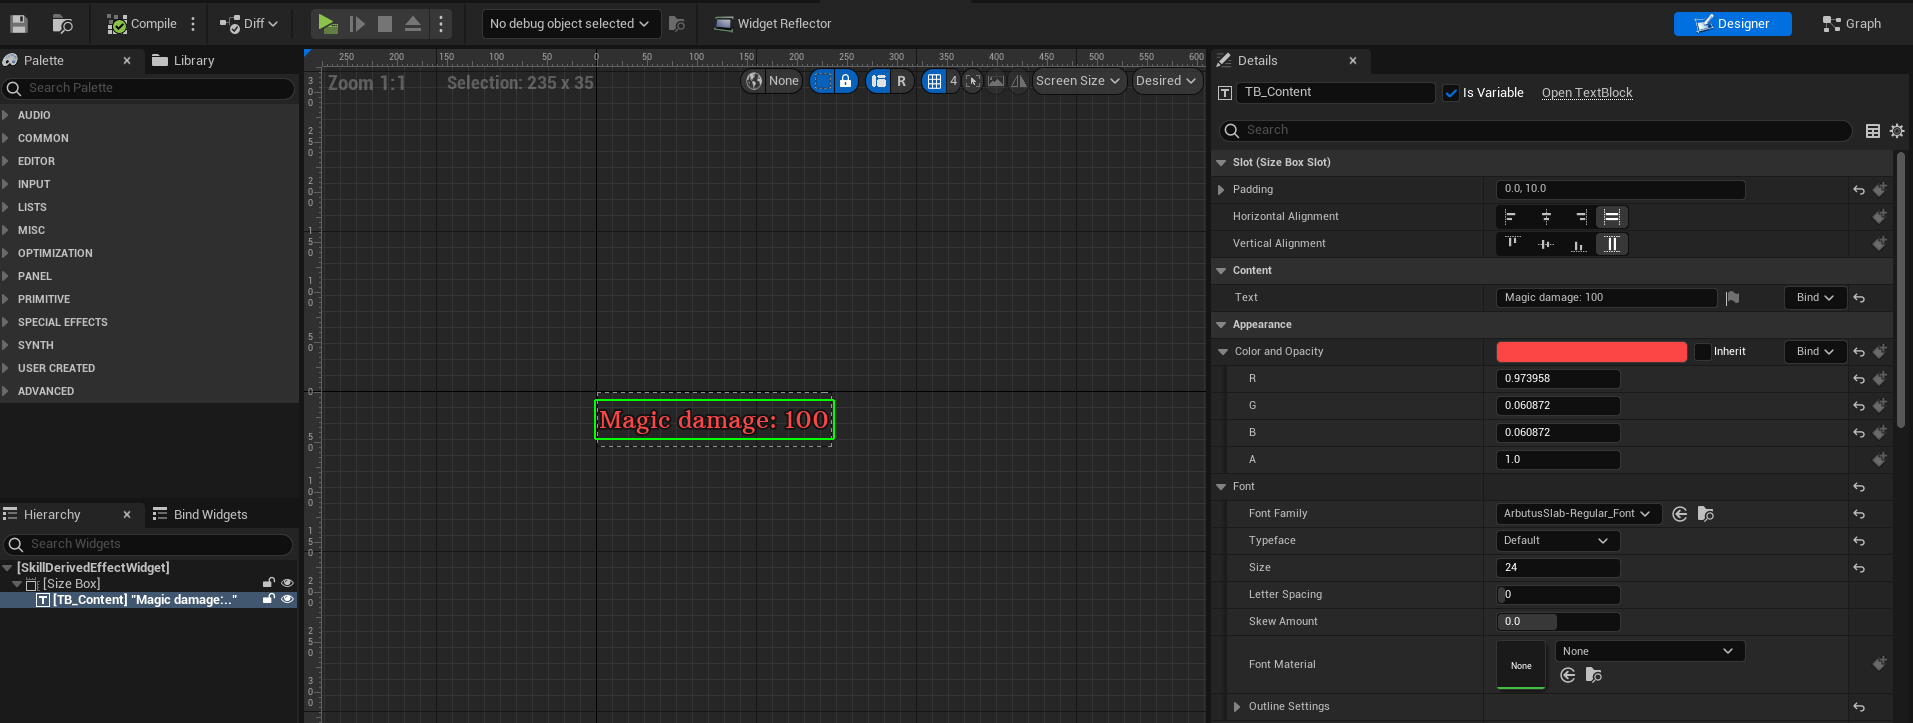
As you can see, this is a pretty simple widget component which basically consists of a textbox.
The unique features of this widget comes from the graph implementation. First we want to create the Damage and Effect parameters, which should be Instance Editable and Exposed on Spawn.
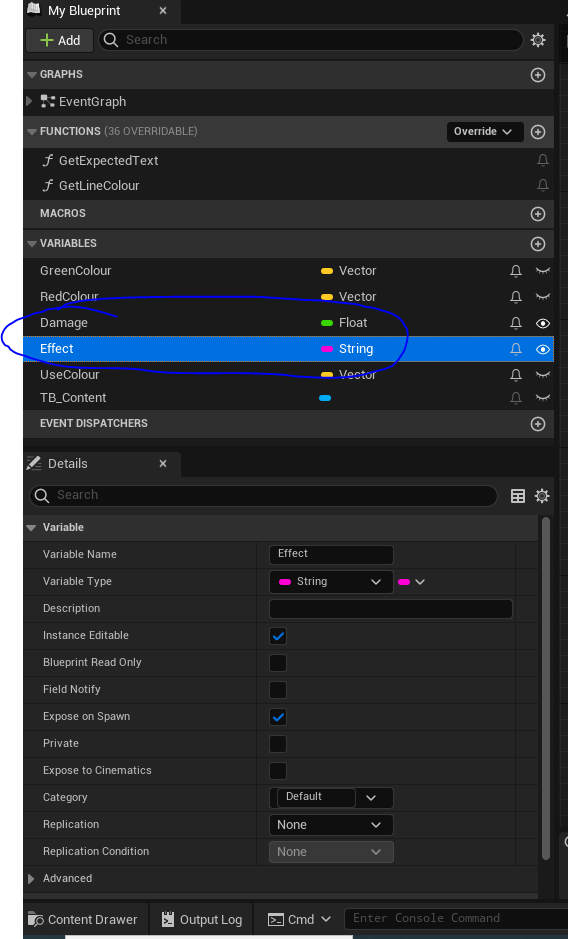
Next, I create a function to populate the text field:
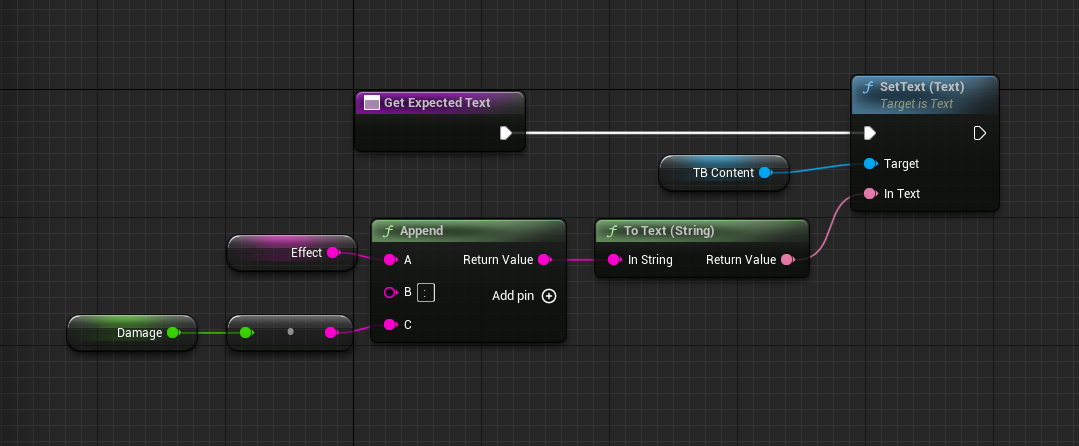
Obviously you can make modifications as you like to these functions.
I also created a optional function to modify the color of the textbox, in this case depending on the damage value.
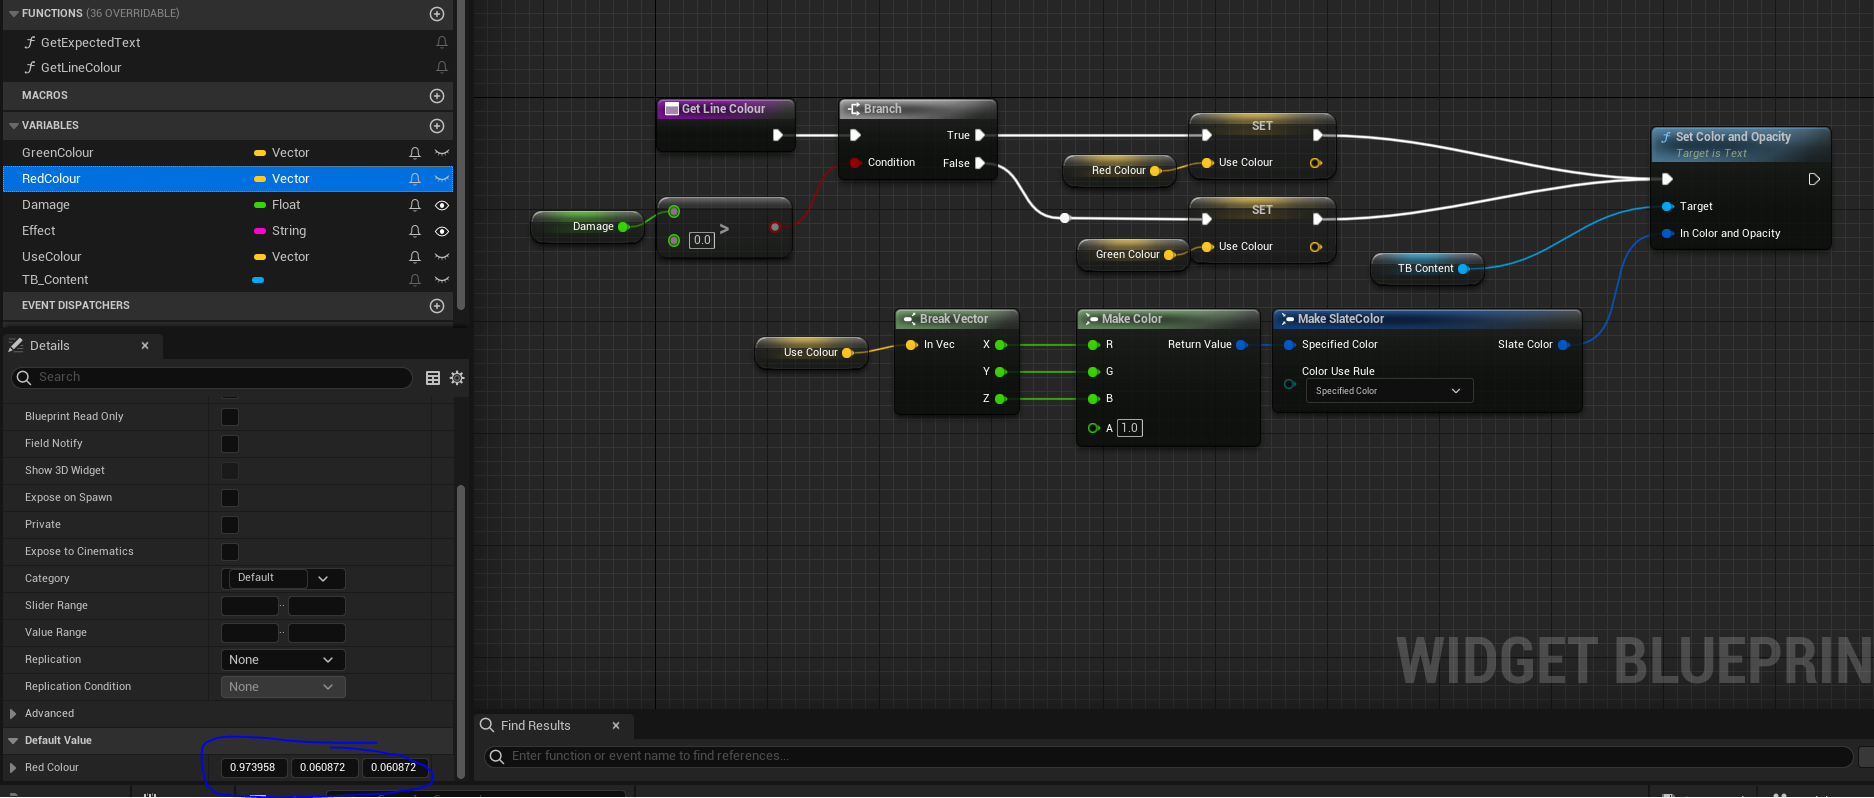
You can see I hold variable for Red Color and Green Color and I set their values as a default value.
Again, don’t forget to call these functions on the constructor.
Skill Book widget
Now that we created the widgets for our skills themselves, we can create the Skill Book Widget.
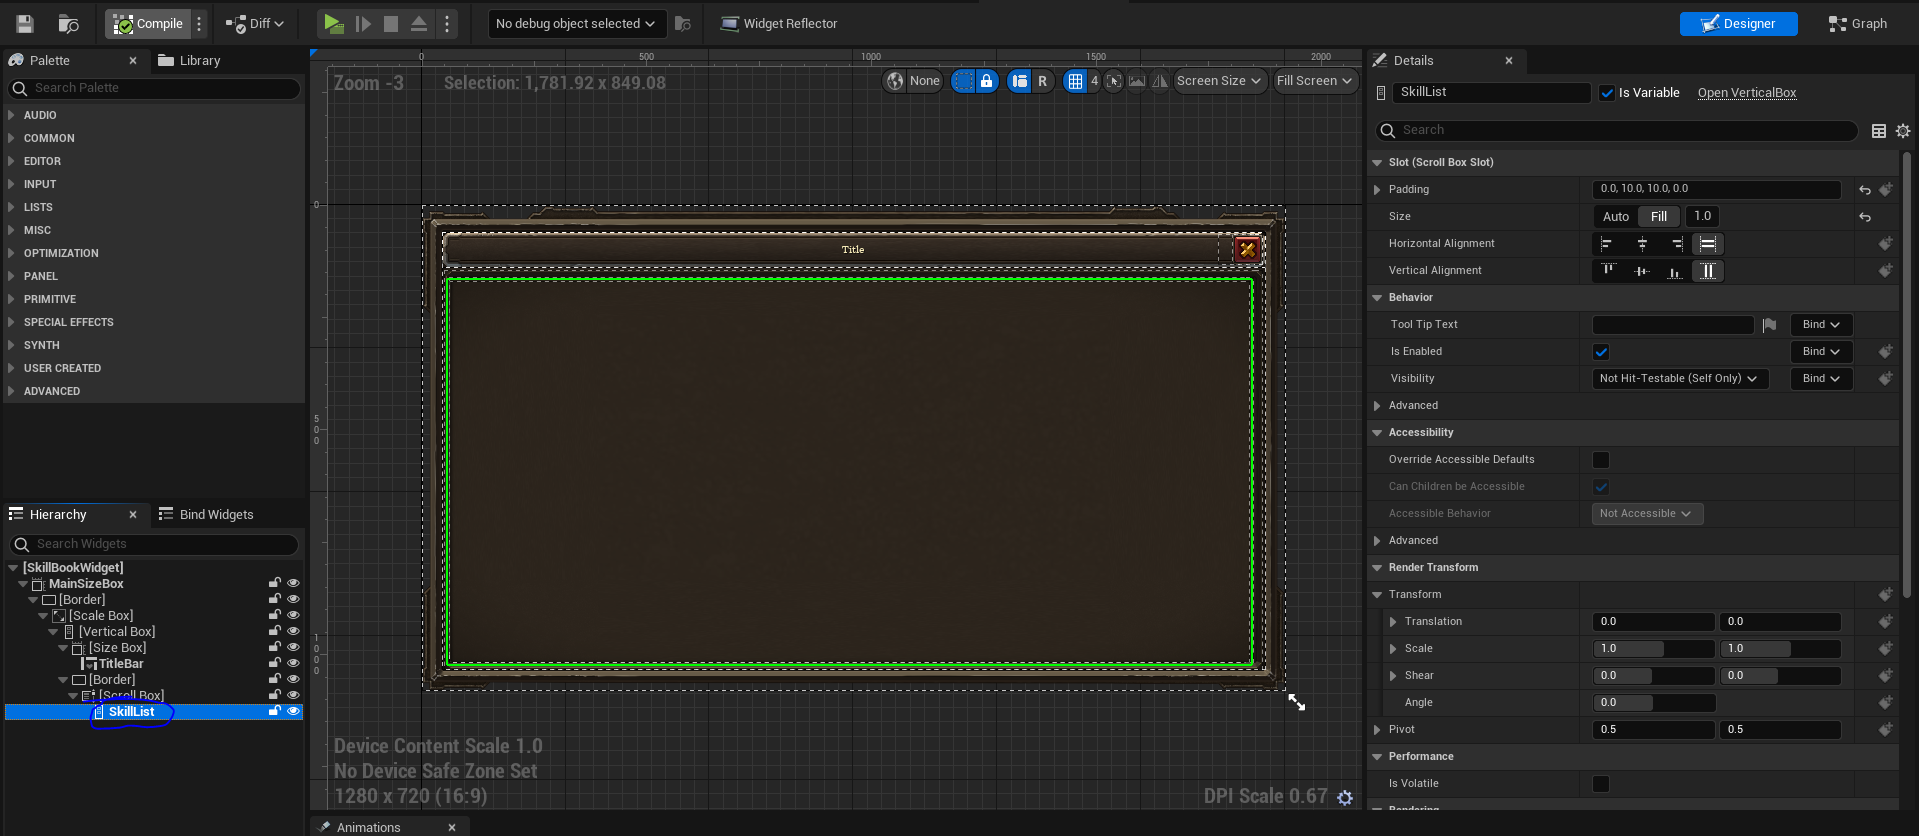
The main thing we’ll focus on is the Skill Book Vertical Box component. We will be dynamically adding skills here based on your input (you can hard code the skills as a structure to test).
Make sure the skill list component has ‘isVariable’ enabled.
The function to populate the skills becomes very simple now.
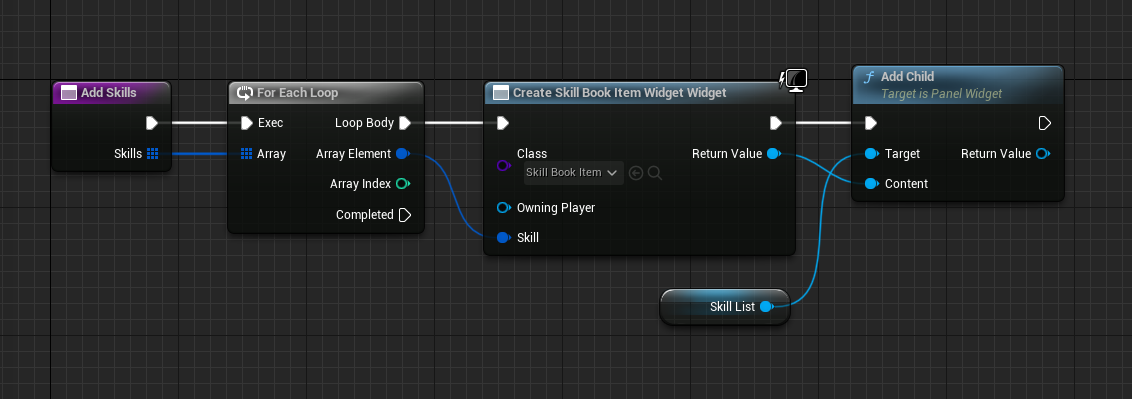
You can now call this function with the skill list that you have.
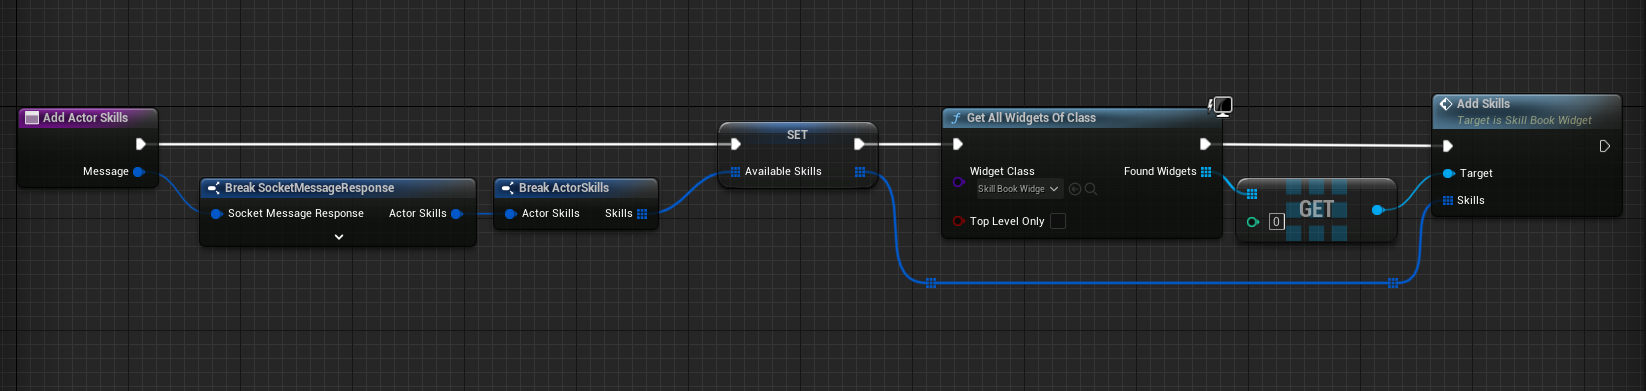
For reference purposes only, I have a Actions Component attached to my Player Character Blueprint which fetches skills assigned to my player, once received I call this function like so:
Creating a basic Action Bar
Now we will start creating the basic action bar, it will consist of two widgets
- action bar itself
- action bar skill widget
We will begin with Action Bar Skill Widget first.
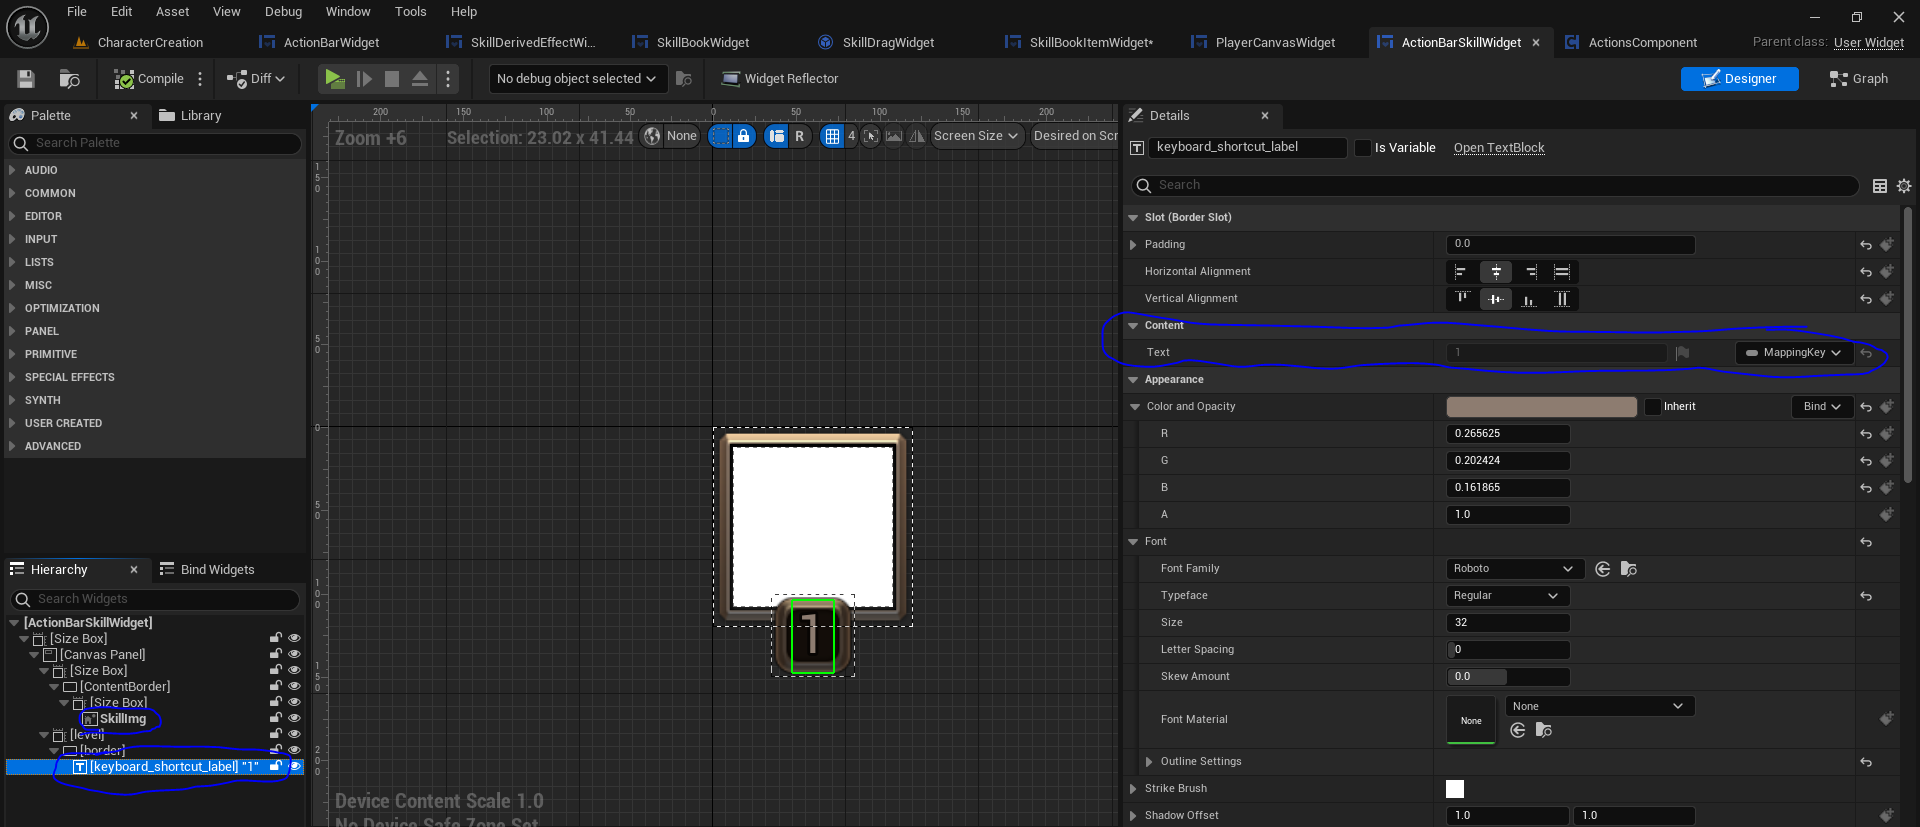
For the time being, this widget will display 2 pieces of information:
- key its bound to
- skill icon representing the skill
Later we will include things like, on hover: give skill details.
For the text mapping the key its bound to, you can see the text is bound to a variable.
In the graph, create two parameters for Mapping Key and Skill which should both be instance editable and exposed on spawn.
The mapping key is bound directly, so no need to make additional functions for it.
Set Skill Image is basically the same function that we used before.
Action Bar Widget
The Action Bar widget in this context is simply the Horizontal Box containing an Array of these Action Bar Skill Widgets.
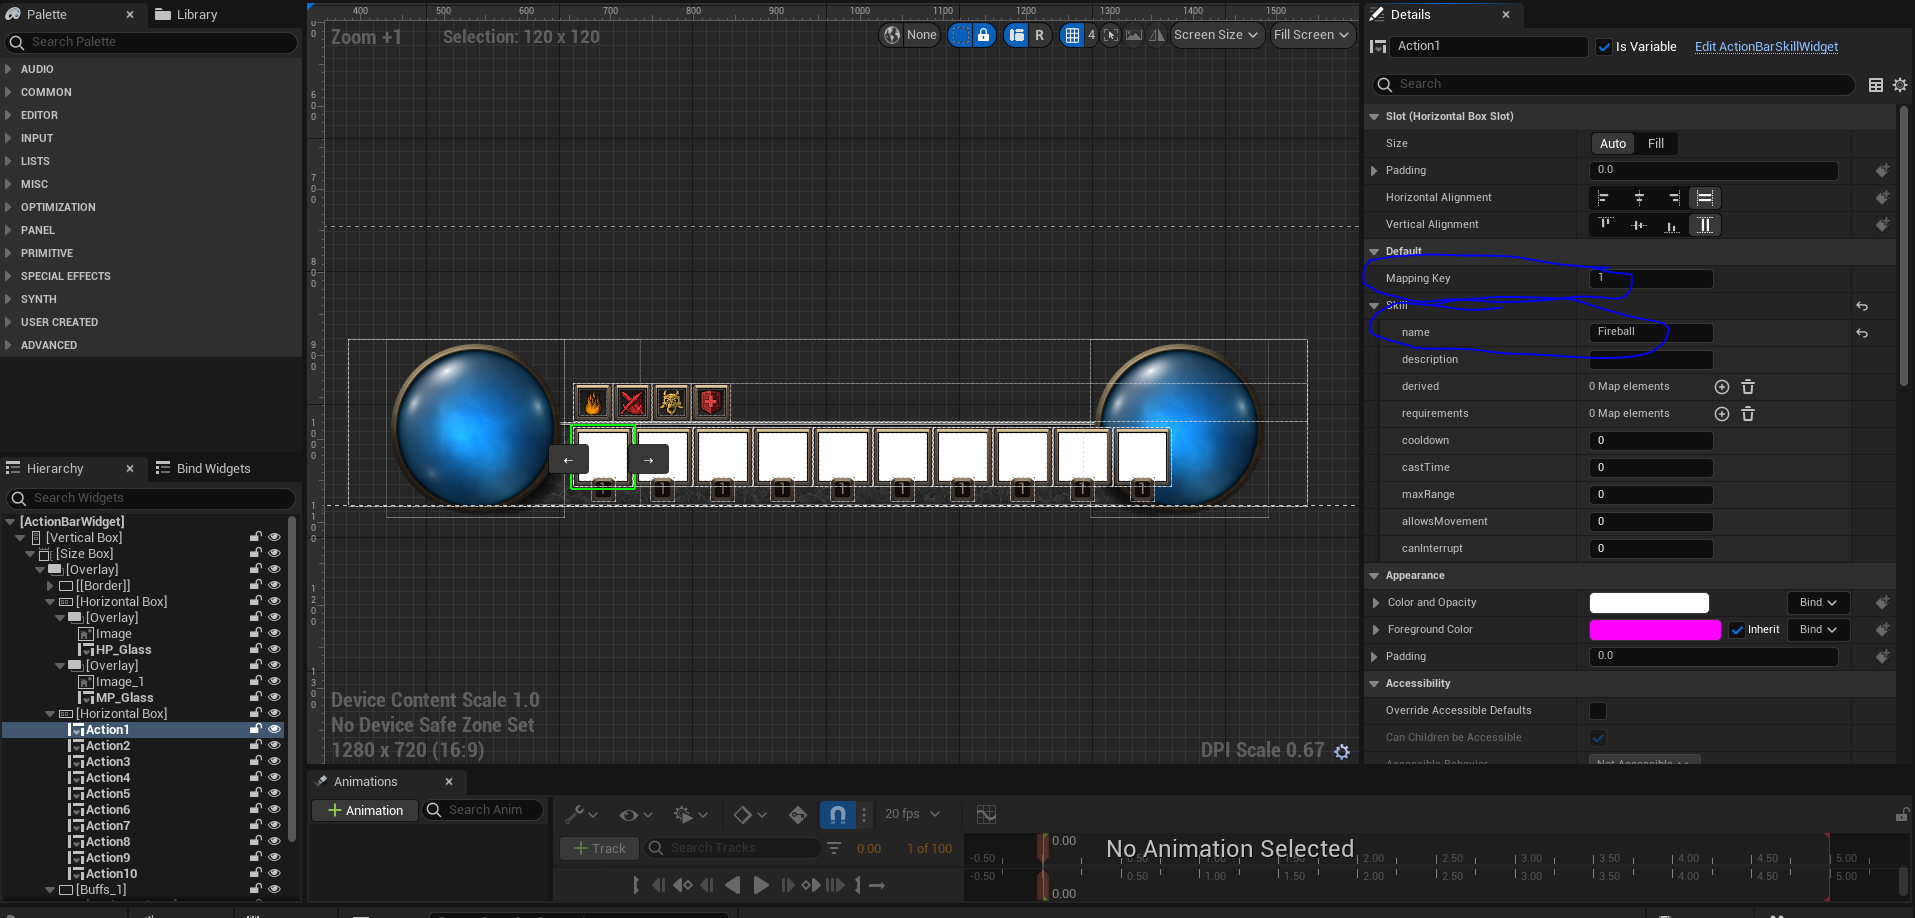
Notice that these components have isVariable enabled and they have a configured default values for Mapping Key and Skill, name. The skill name is used to draw the icon itself.
I then create a new event graph to handle the activation of any of those skills in the action bar.
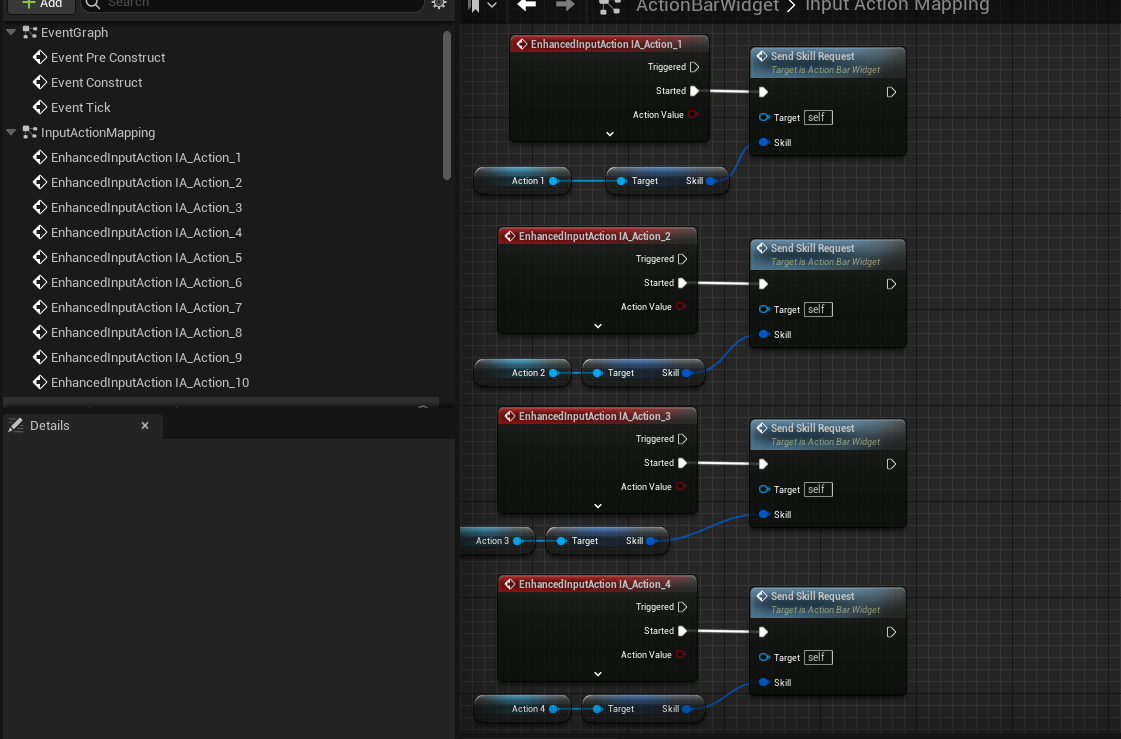
The way you activate the skills is entirely dependent on your project.
For reference only, here’s how I did it in mine:
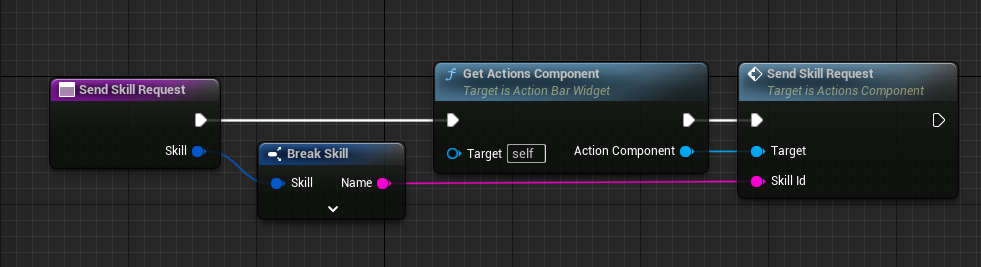

I have a actor component (Actions Component) which is attached to my player character blueprint. I add it to my Game Instance to expose it to other blueprints, such as this. This actions component contains information about the target for the skill, so when I activate the skill I send a request to activate skill ID against that particular target. This is subject to change as it was just created like this for demo.
Create input actions
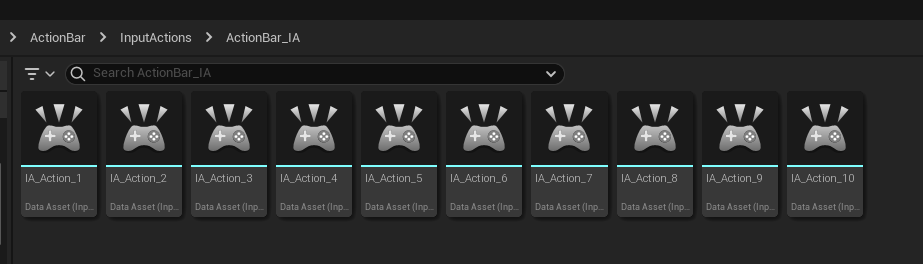
First, you will want to create Input Mapping Context and the Input Actions.
My input mapping context is called ActionBarActions. I then create 10 input actions with default values:
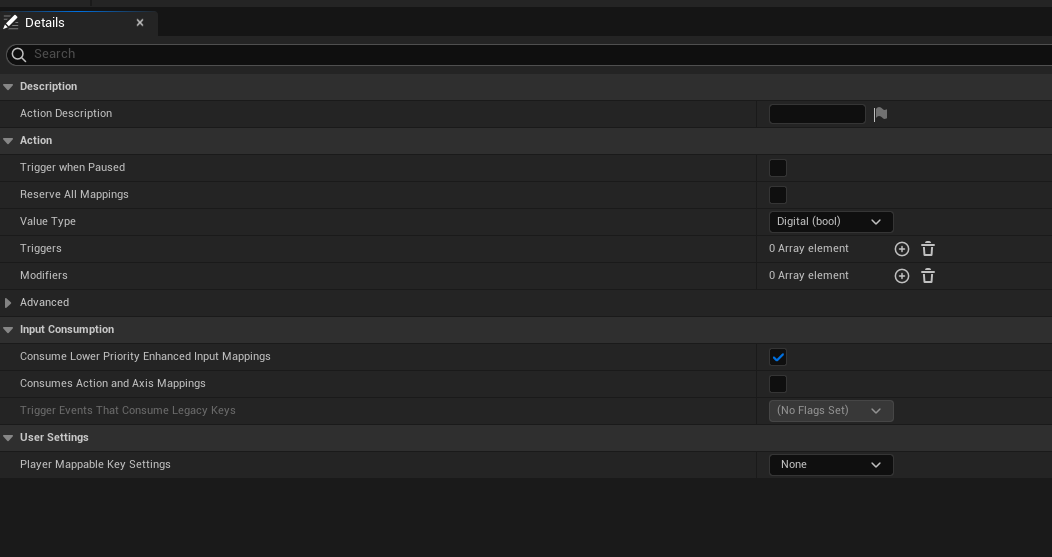
The input actions can be kept with default values (Digital bool)
Here’s my Action Bar mapping context.
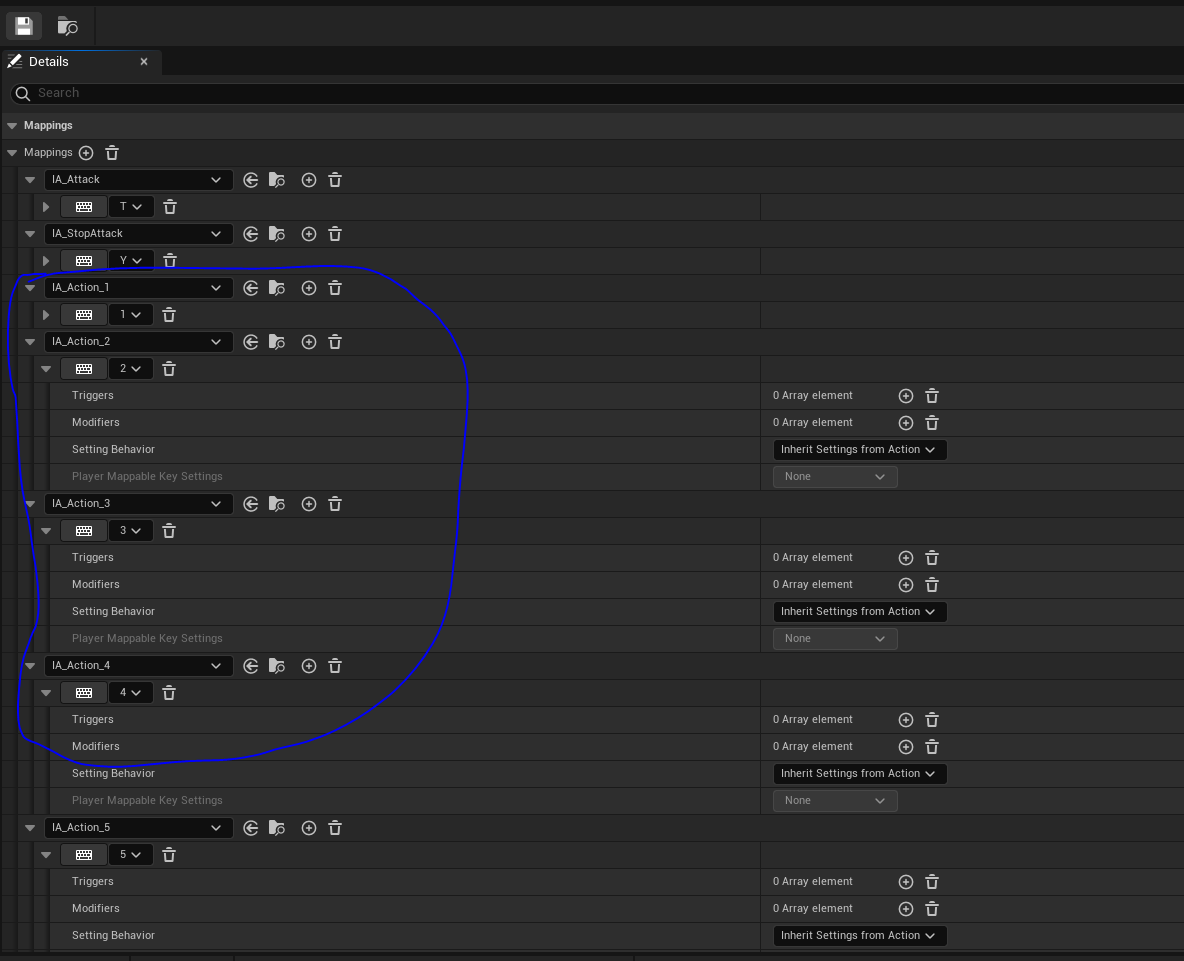
You don’t need the IA_Attack and IA_StopAttack – those were used in previous posts.
Here you can map the keys to whatever you like, so it doesn’t have to be 0-9.
Once you’ve done this, you will be able to start adding these.
You will also need to register these inputs in your game, I added this in my Actions Component actor widget like so:
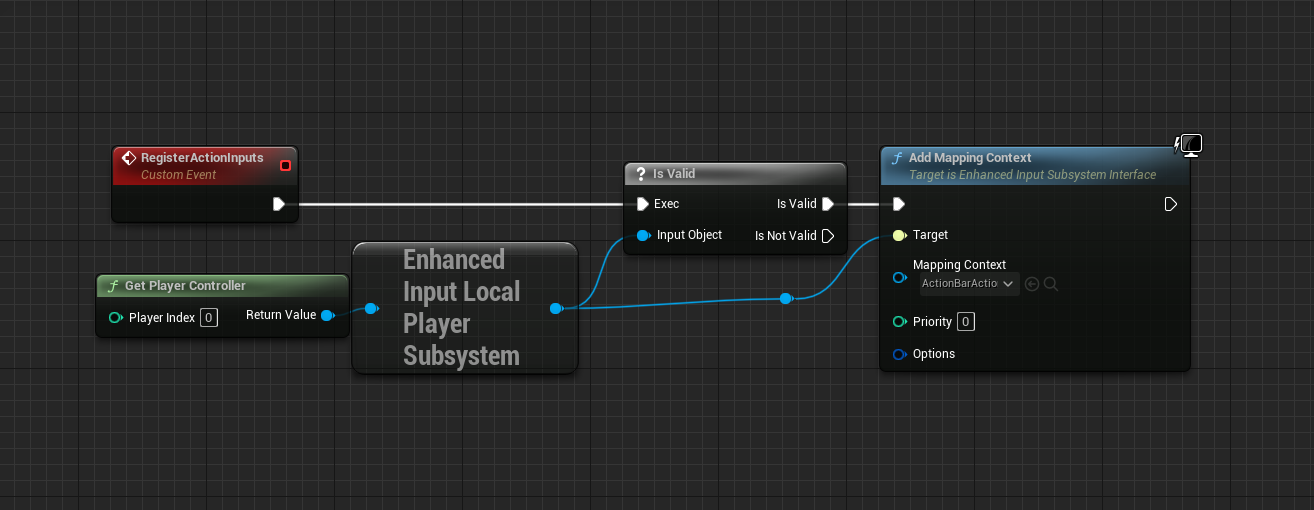
And just link it to your active constructor/begin play.
What we got so far
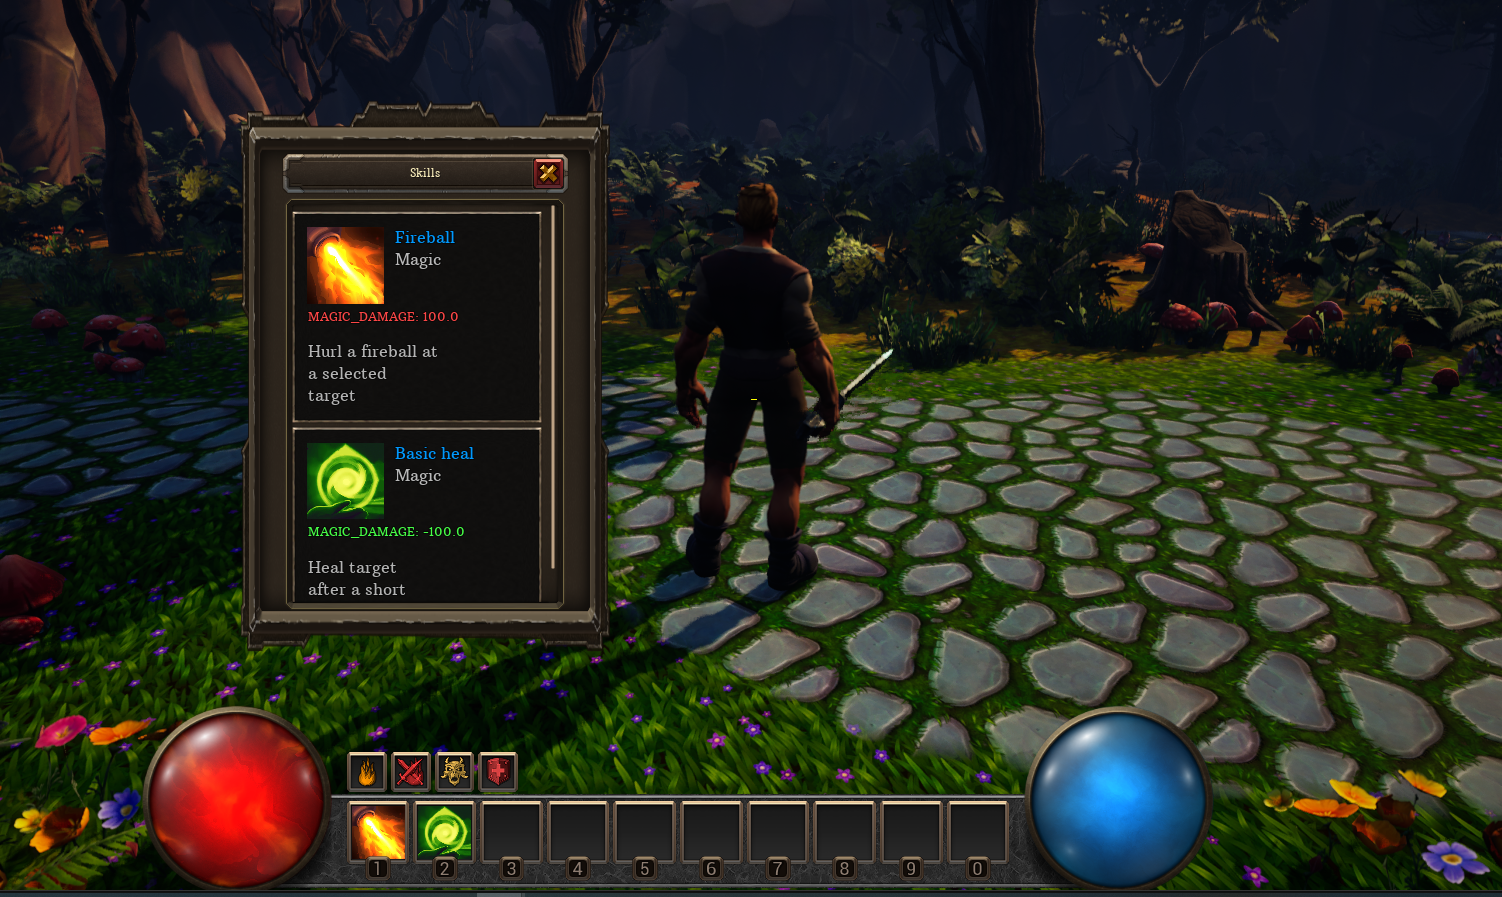
I added default skills to two of the action bar components.
In the next post we are adding drag and drop functionality from the skill book to the action bar, making it fully dynamic!