
We’ve previously looked at how to create a simple animation blueprint for actors in our project.
In this post, we will look at how to leverage the new motion matching feature that’s released with Unreal Engine 5.4.
The official documentation can be found here: Motion Matching In Unreal Engine | Unreal Engine 5.4 Documentation | Epic Developer Community (epicgames.com)
It’s quite good, so do check it out!
Pre-requisites for Motion Matching
First, you need to make sure you have Unreal Engine 5.4+ installed, I am using 5.4.1.
Next, you will need to enable the Motion Matching plugin in your project, its named ‘Motion Trajectory‘. Find the plugins menu by clicking Edit -> Plugins.

We will also use another plugin called ‘Chooser’ so find and enable that too.

Next, get yourself the actor class you want along with the animations. A lot of people choose to use Lyra animation set.
I will personally be testing with assets from N-Hance studios.
So you mainly need a character blueprint, something like this:

Default UE Mannequin will work.
And a set of animation sequences that you want to integrate with motion matching. For animations, I will integrate with ones from Lyra project.
Getting animations from Lyra project
So you can find a lot of different animations on the UE marketplace. In this particular step, we will integrate the Lyra default/unarmed animations.
First, find the Lyra starter project in UE marketplace:

When you create the project, we can search and find the unarmed animations in: content -> characters -> heroes -> mannequin -> animations -> locomotion -> unarmed.
Ideally they’d be split into different categories and organized in their directories. Will get into that when we start putting them together.

Select all the animation sequences here that you wish to import to your project.

When you click Migrate, UE will automatically evaluate all dependencies and select them for you.

Select the Content folder of your project when migrating these assets.

If you open up your project, you should now find those animations available.

Retarget animations
I will assume that your game is not planning to use the mannequin, like mine. So you will also need to retarget these animations.
In order to retarget, right click an animation and select Retarget Animations.


Here you will need to select the target skeletal mesh.
Your assets should have existing skeleton/skeleton mesh blueprints or animation blueprints.
I am able to confirm the desired skeleton mesh blueprint to use from my packs animation sequence examples, like so:

So now I am able to select it in the target.

Select all animations from the menu and click Export Animations.

The assets I use are compatible with the UE skeleton, so the auto retarget functionality works well. You should check that your skeleton is compatible, otherwise you may need to do additional steps to get this working properly.
After this export, you should now have the animations available and ready to use.

Creating motion matching for your character
Now you’re ready to start configuring the motion matching for your character.
First, create the motion matching Pose Search Schema. You can find it by right clicking, under animation -> motion matching. If you don’t see it, it means you haven’t enabled the plugin so check the pre-requisite step.

The motion matching is applied based on skeleton, so find the skeleton which is used in your character blueprint.

I called this file ‘Hu_M_PSS’ and I will have a different one for each different skeleton character that I have. For example:
- human male
- human female
- orc male
- orc female
Next, we want to create the Pose Search Database:

Link it to the previously created PSS, I named this file Hu_M_PSD_Default as it will be the pose search database for human male and it will be for default movement set. I.e. when the character is not equipping special weapons, not swimming/floating/combat etc.
Preparing animations
First thing we want to do is enable root motion on all the animation sequence assets you will be using.
Note that not all animation sequence assets have this feature available. For example, the animations with N-Hance assets do not support root motion at the time of writing this post. I have raised this as a bug/feature request with their team but can expect it will take months to resolve.
I will first search all animation sequence blueprints in the sub-folder:

With all the animations selected, right click -> asset actions -> edit selection in property matrix.

In this menu, select all animations and make sure to get a tick on enable root motion and Force root Lock.

It should then look like this:

Organizing animation sequences
Now I want to organize the animations I will be using in motion matching. I want to find all the default animations that I want to use. By this I mean ones which are not dependent on factors other than basic motion.
Other factors include things like:
- falling/floating
- combat
- swimming
- equipped weapons (2h, bow, etc)
I go ahead and copy or move animation sets into a new sub-folder for my default animations:

As you can see, it includes animations for:
- walking
- running
- idle
- jump
All the animations are for either no weapons equipped and they’re also suitable for 1h weapons too.
Add animations to database
Now we can open the PSD and start adding these animations.
Simple way to do that is to open the content browser that you should see at bottom left when your PSD is open. Then simply find the animations and drag them in.

Feel free to add just the ones you require to this database of animations.
In this one, I included:
- idle
- walk
- run
For jump, we will cover that separately through another database – we will cover that further in this post.
Now we want to start linking these to our character, we do this through animation blueprints.
Before we do that, we also need to add Character Trajectory component to our actors.

Animation Blueprints
Inside your Animation Blueprint, find the Event graph and in event begin play, we want to get the Character Trajectory component and promote it to a variable.

Now let’s go to the Anim Graph. For context, this is my BEFORE:

You will want to add Motion Matching (under pose search) and then connect it to Pose History function.
Link the trajectory using binding, like this:

It’s now ready.

Testing the animations
When I tried to play game, I got some compile errors from Footstep Effect Tag Modifier:

For the time being, I will simply disconnect this function and will check fixing it in future.
After disconnecting, I have the basic motion matching working, as expected.

This motion matching is able to handle
- idle
- walk
- run
all for unarmed/default motion (non-crouching, etc.)
How do we add other motion matching pieces
Now we will want to extend the functionality of motion matching by allowing us to switch the databases used for motion matching.
This can be achieved using the new Chooser plugin.

Next, let’s create another database (PSD) for the jump motions.

Let’s add all the jump animations to it.

Configure Chooser to use the new PSD
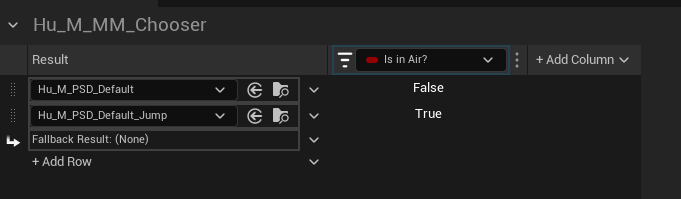
Right click in content browser and search Chooser and create this table.

When you created your chooser table, you will want to configure it.

It will be used in your Animation Blueprint so select the context data as the animation blueprint used by the actors/character.
The output is the Pose Search Database so select that.
Now you can Add Row and select Asset.

Insert the two options for the PSD that we have, these are the potential outputs.

Now you want to add another column, which is used to determine which PSD is used.
This can be whatever you need it to be, for Jumping, it should be boolean – more accurately, it’s ‘isFalling’.

I can now bind the bool to the isInAir from animation blueprint, as that was configured on the input value.

Finally, the result should look like this:
Adding parameters in your animation blueprint
Just in case you’re not sure how to add and link the variables in your animation blueprint.
These are simple variables that are in your animation blueprint, which are configured in your event graph.
Here is an example of how the IsInAir set, which is taken from the movement component.

Connect the Chooser table in Animation Blueprint
Let’s go back now to where we have the motion matching configured in our Animation Blueprint.
We should have the following:

Now select the Motion Matching node and change the Database connection to be Dynamic Value, also un-expose it as pin.

Next, create a binding on update.

Inside this binding, we configure the chooser to select the database.

Adding another channel to PSS
This should now work but not too well.
We want to add another two channels for the PSS to monitor, so open that up and find the ‘channels’ settings and add new field, for Velocity Channel.

For the bone, I’ve selected Pelvis, which is the parent/root of the Spine.

Now add another channel and this time select Position, select Pelvis for the bone again.

This should now work smoother

