41. How to turn your Unreal Engine to MMO using custom server and Websockets
In this post we continue the journey of making MMO server using Unreal Engine and our Micronaut java server.
This is the continuation of these posts:
- How to make effective comms between UE and custom server (overview)
- Implementing a good backend system design
- Connecting your Unreal Engine to your websockets (synchronize players) (this post)
- Motion smoothing for your actors
- How to spawn and control mobs using UE connected to our MMO server
This post specifically focuses on how to integrate with our custom server using Websockets implemented using Websockets.
To facilitate with this I was initially using Blueprint Websockets plugin
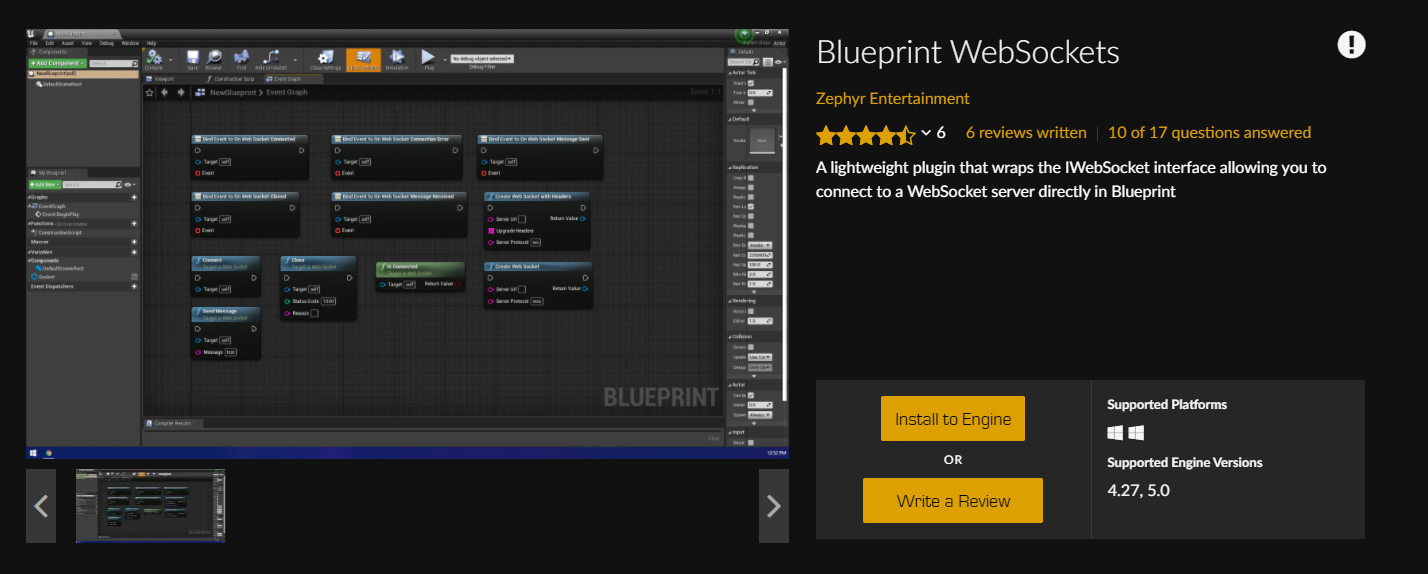
But this has no support for some of the recent versions of UE so you coulduse Easy Websockets plugin instead (or check both to see compatibility with your engine).

I am also using VaRest plugin for helping me with serialization (this is perhaps less efficient, but faster to implement)

Let’s get started!
Generic component to deal with all comms
I began by creating a new blueprint, of parent Actor Component.
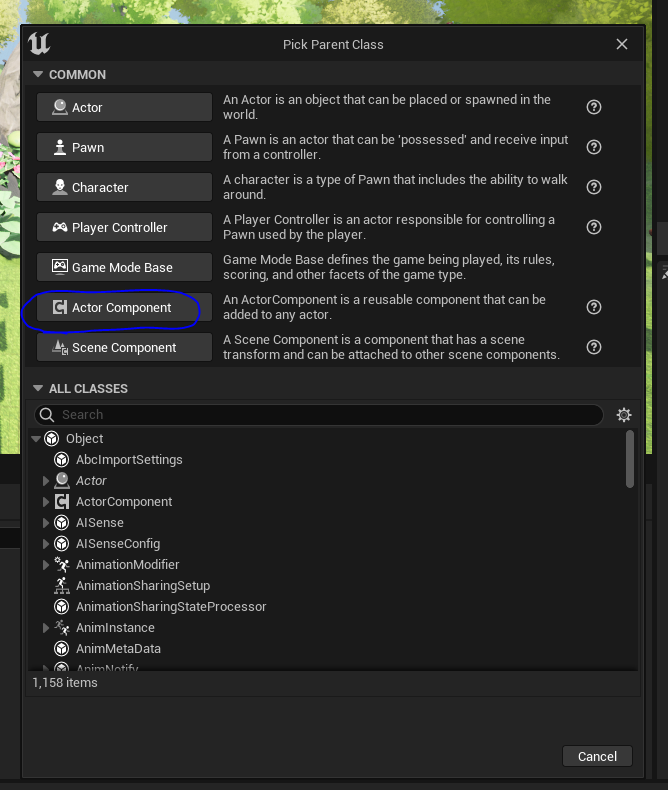

This is because I will attach this component to my Player actor as well as mob spawner actor.
Inside this component, I create a new graph to handle the socket connection.

The first thing I do is get the socket URL, which I will use to connect.
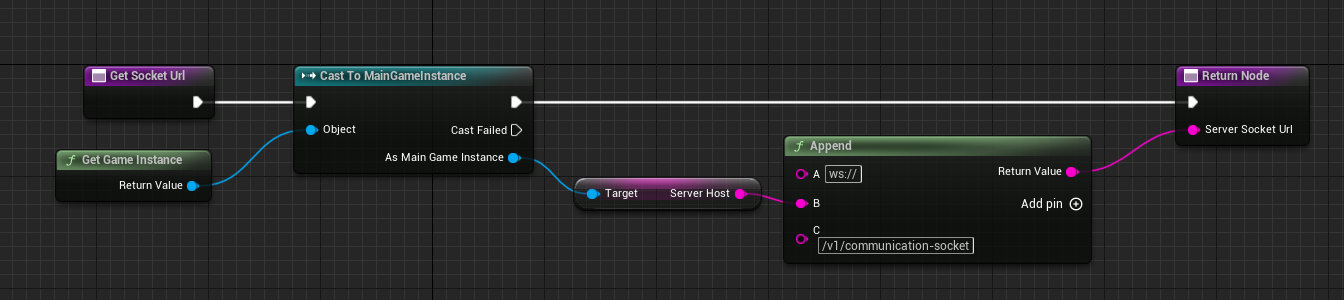
I store this server host in my MainGameInstance. In my local environment, it’s simply localhost:8081, this is because that’s what my Micronaut server is configured to locally. This host can be different depending on your server, in particular your server may run on different port, common default ones are 3000 and 8080.
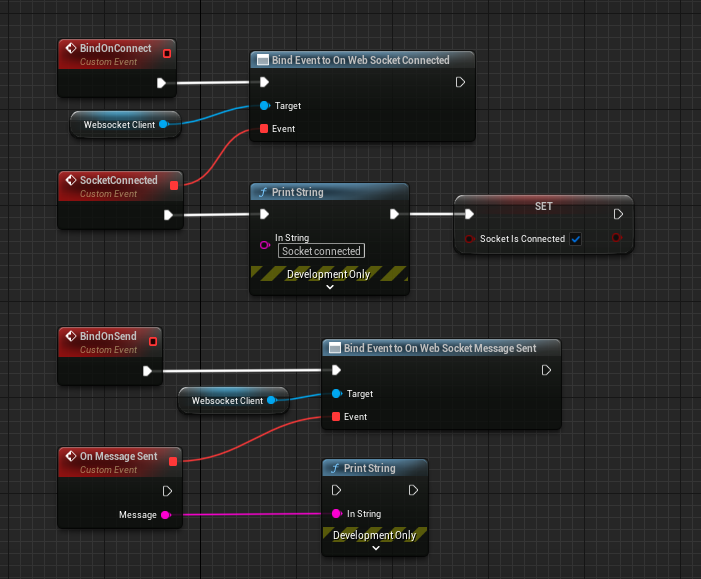
Next, I bind my onConnect and onSend. This is mainly just for debugging purposes, but you may have other use-cases for them.
SetUpdateTimer is determining how often we ask the actor to be synchronized with the server.
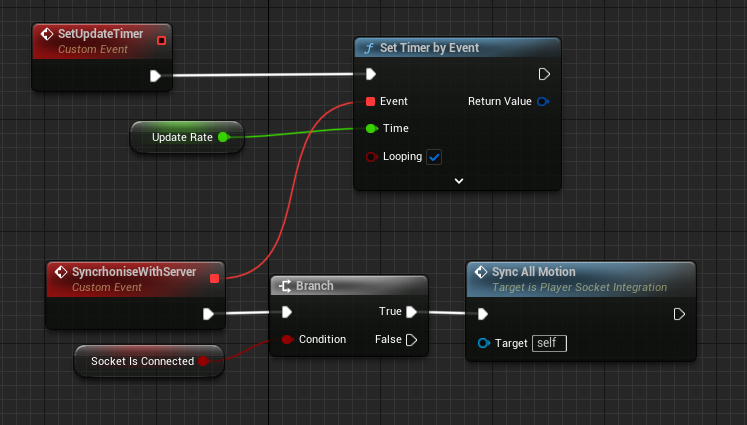
i.e. how often we push data to the server. By default, I’ve set the update rate to be 0.1 seconds.
Bind on message received is a key function. It can perhaps live in a graph of its own. It’s main purpose is to receive the message, serialize it into a struct it can process and based on the update type, send it to correct function/graph.
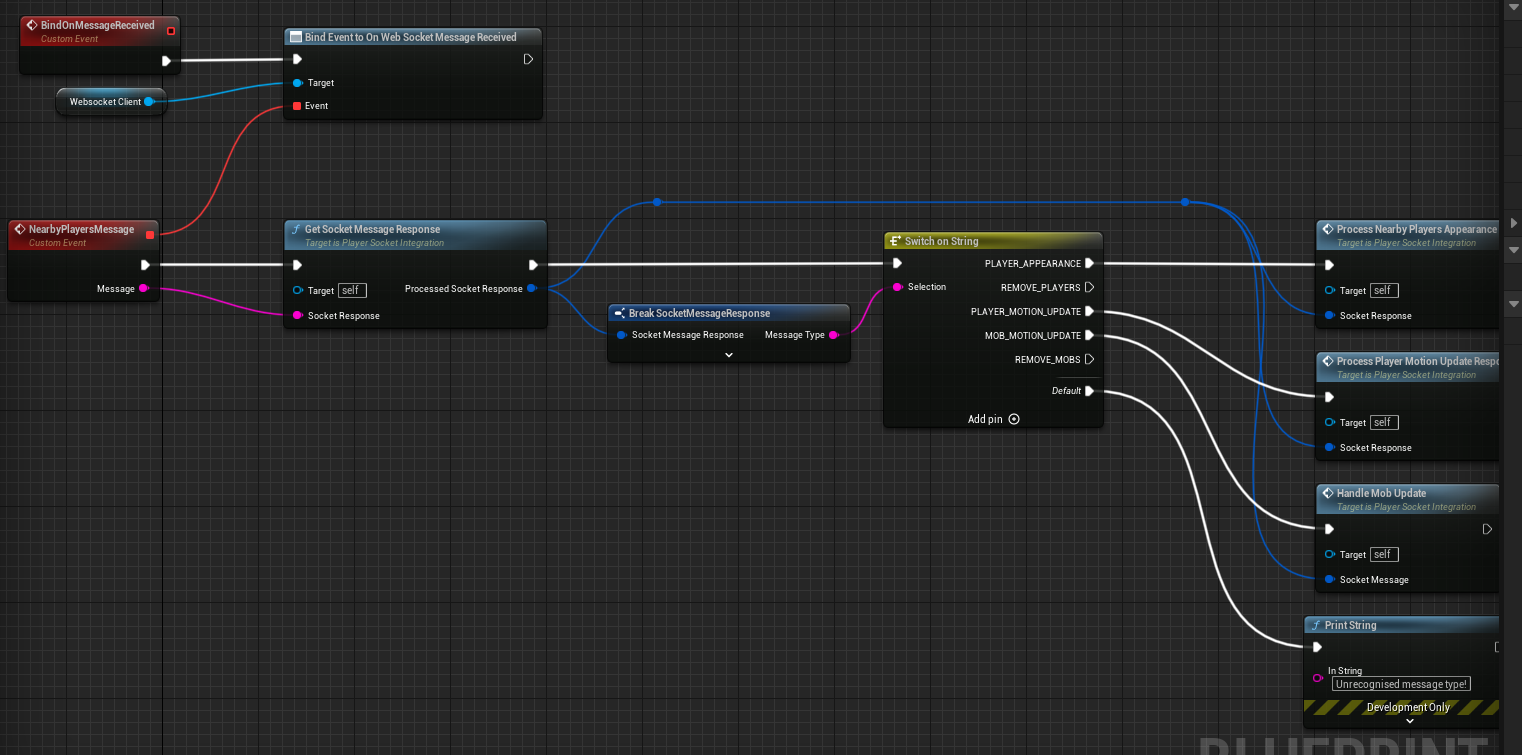
This function will grow considerably as we will add extra functionalities, that’s why it may make sense to refactor it into its own graph.
Adding this component to the player
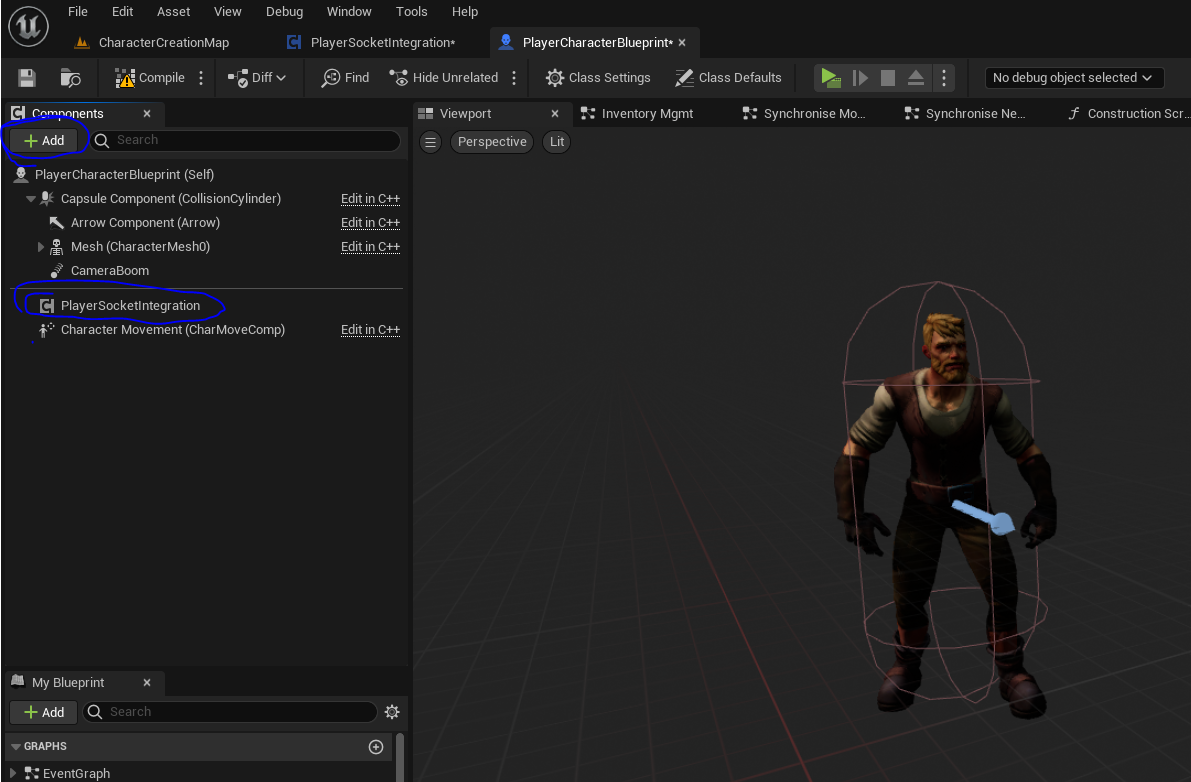
Now that we have a component created, we should add it to our player character blueprint. It can be now or later – but don’t forget to configure it!
So just open up your character blueprint and add a new component – the PlayerSocketIntegration component.
I created a basic custom event which will configure the player to be synchronized.
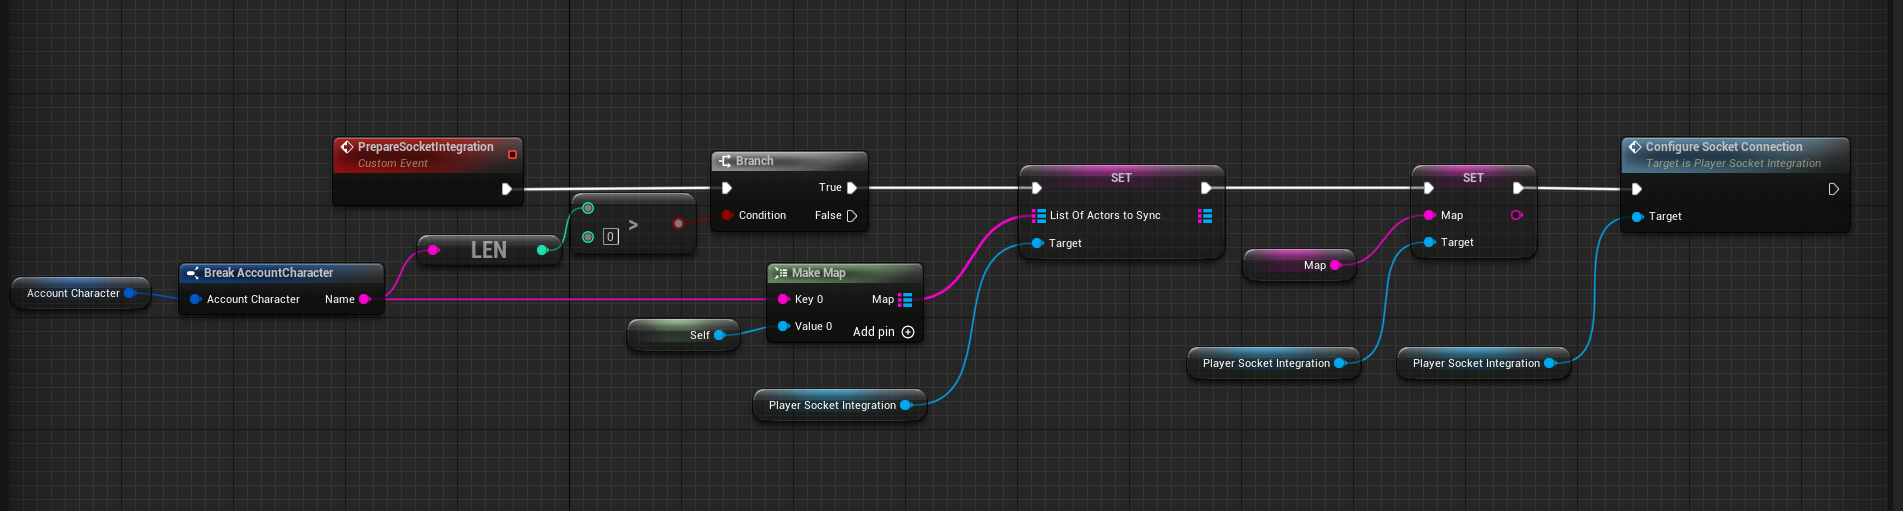
You don’t need to do the initial branch logic, this will be replaced with ‘isAuthenticated’ in the near future. Basically we just set the List of actors to sync in the Player socket integration component with this actor and the key is the players name. We also set the map, which is just 1 for now so is static (its configured via game instance settings). We then call the Configure Socket Integration which will setup the socket connection and bind all the necessary functions.
Creating Game Instance
In case you’re not familiar how you can create your own game instance, here’s some brief info.
Game instance can be typically used to store global variables and be accessed from most blueprints in the game.
We are able to place variables such as the server address in the game instance so that we don’t have to duplicate it in many places.
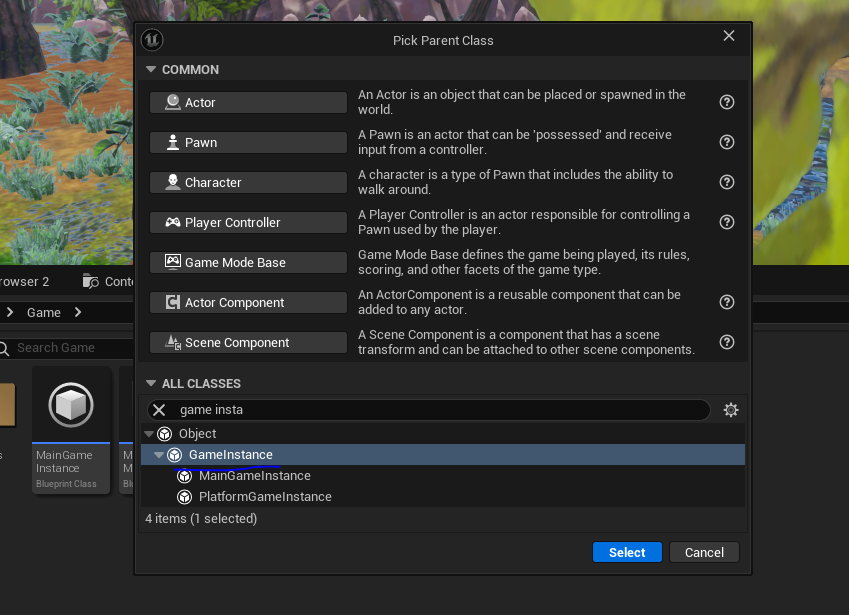
In order to create one, create a new Blueprint and for parent, select Game Instance.
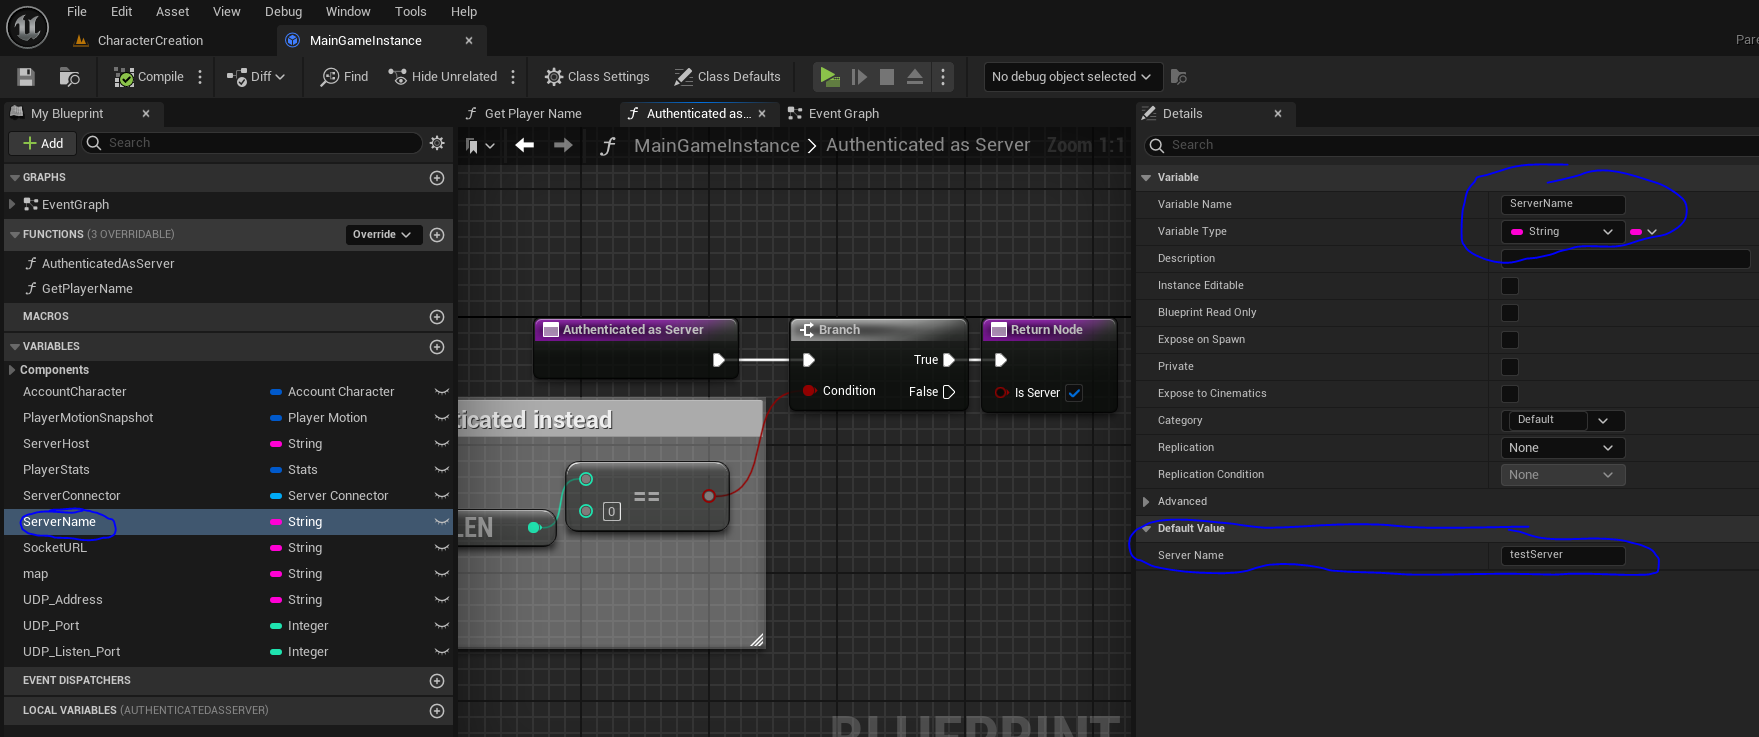
Here now you can add the global variables you wish, like the Server Name.
You will then need to enable this game instance by configuring it in project settings.
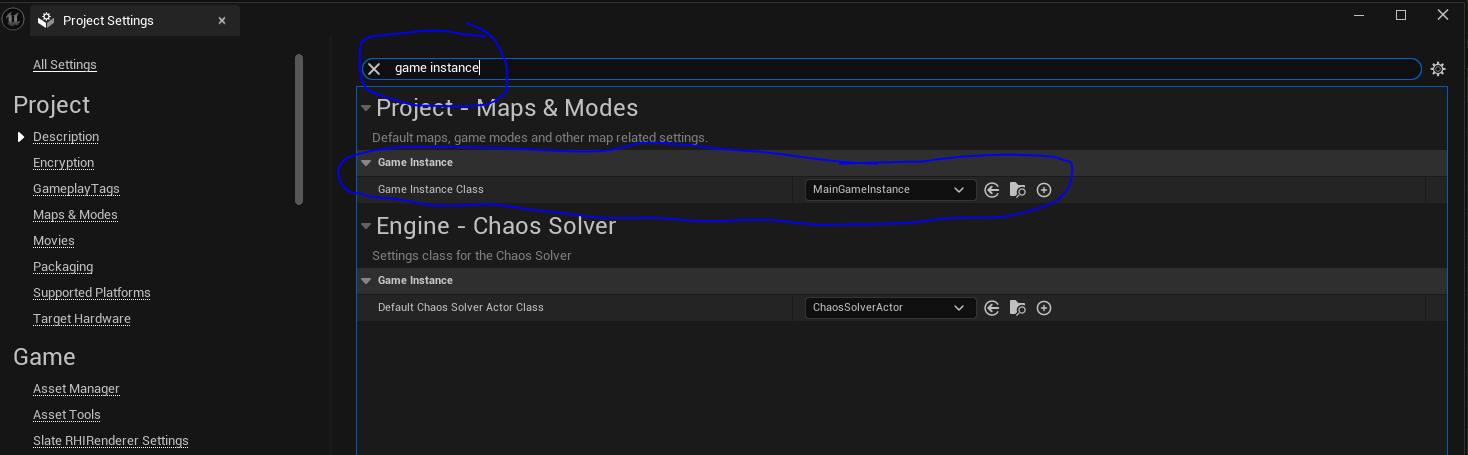
And now you can use this game instance in your blueprints.
Request and response structures
The request and response structures will evolve over time and they should simply reflect the requirements for your server.
Do note that I am sending JSON structures to help with readability and debugging. Also the serialiser currently still includes null fields, which is not great for payload size.
But let’s look at what we currently have, here’s the SocketMessageStruct:

This is the structure that we send to the server, indicating the update type and all possible information (currently) required. The PlayerName/ServerName are temporarily added while my server does not have authentication setup.
The SocketMessageResponse is as follows:
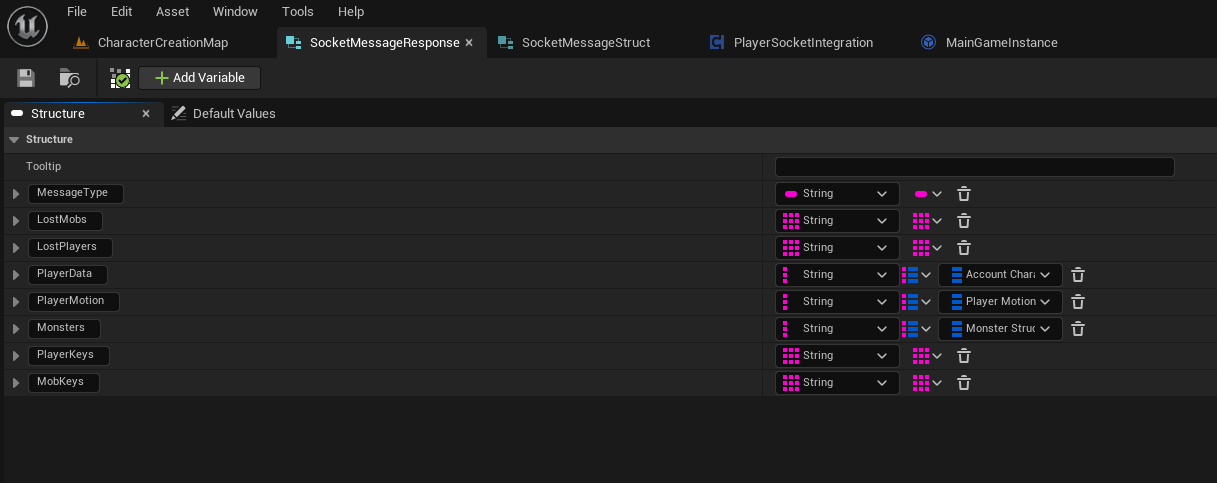
This is the response that we will receive from the server. Note that we’d not expect ALL fields to be populated, only relevant ones depending on the message type.
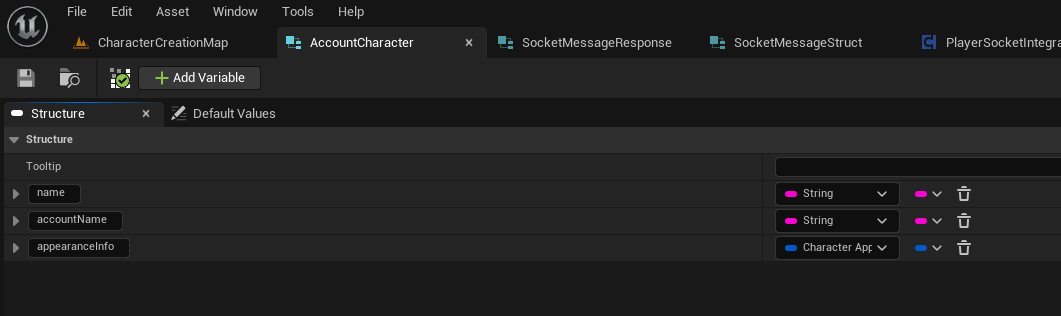
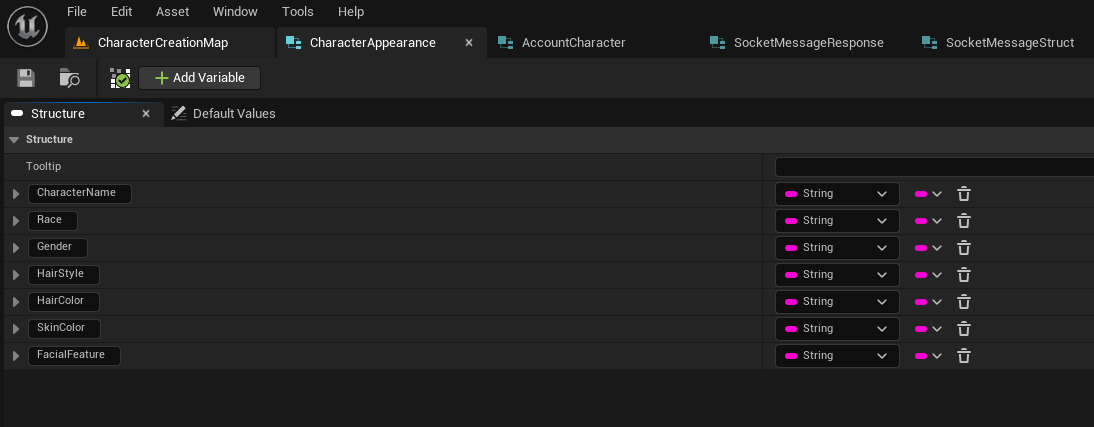
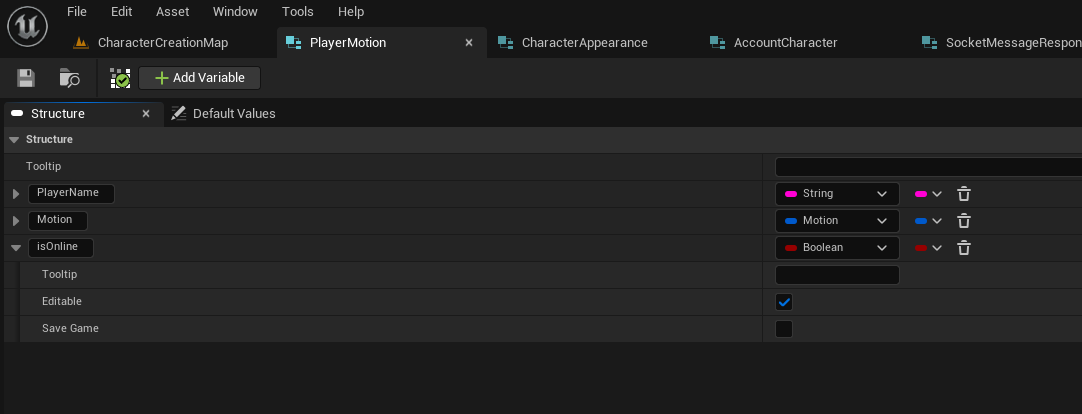
For completion, here’s the nested structures from above.
Account character:
Character appearance:
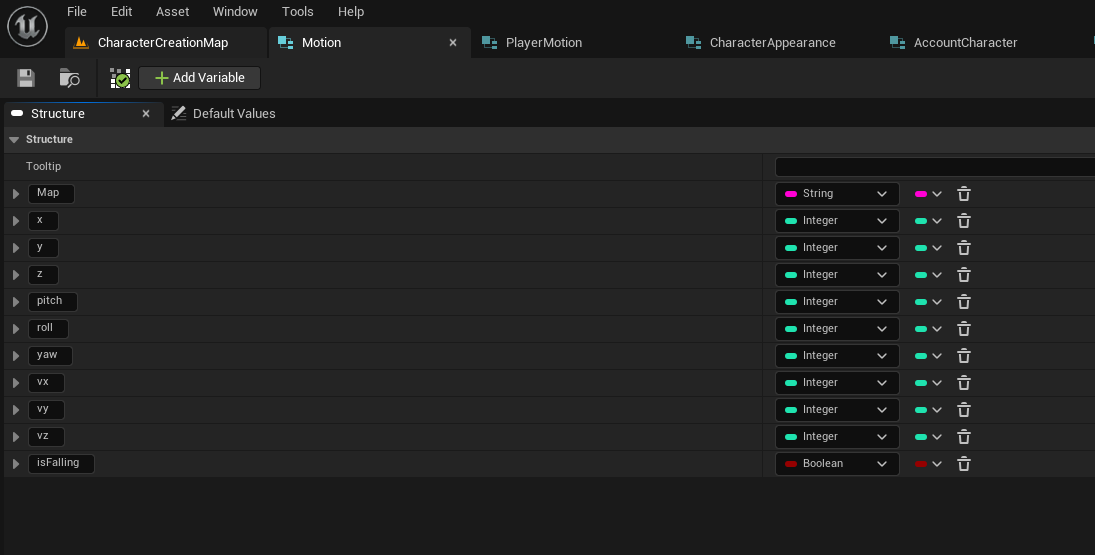
Player Motion:
Motion struct:
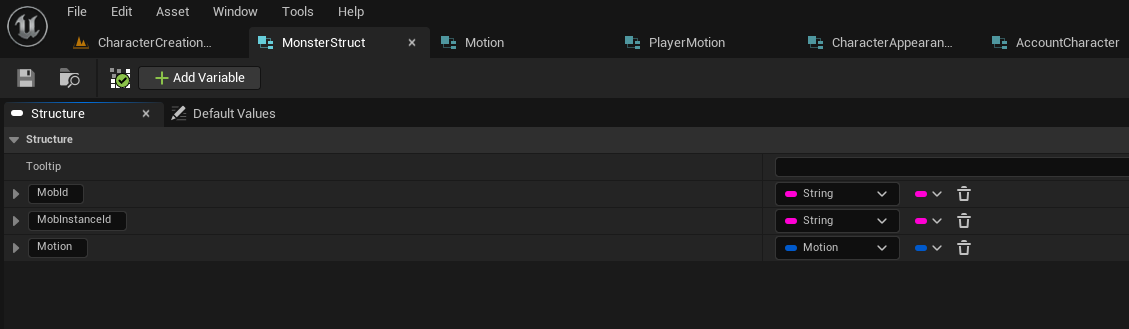
And finally the Monster structure:
Synchronizing the player/mob motion
Ok so we referenced the SetUpdateTimer, which is calling SynchAllMotion function.
Let’s dive into what that does. I created a separate graph for this, but its actually relatively small/simple.
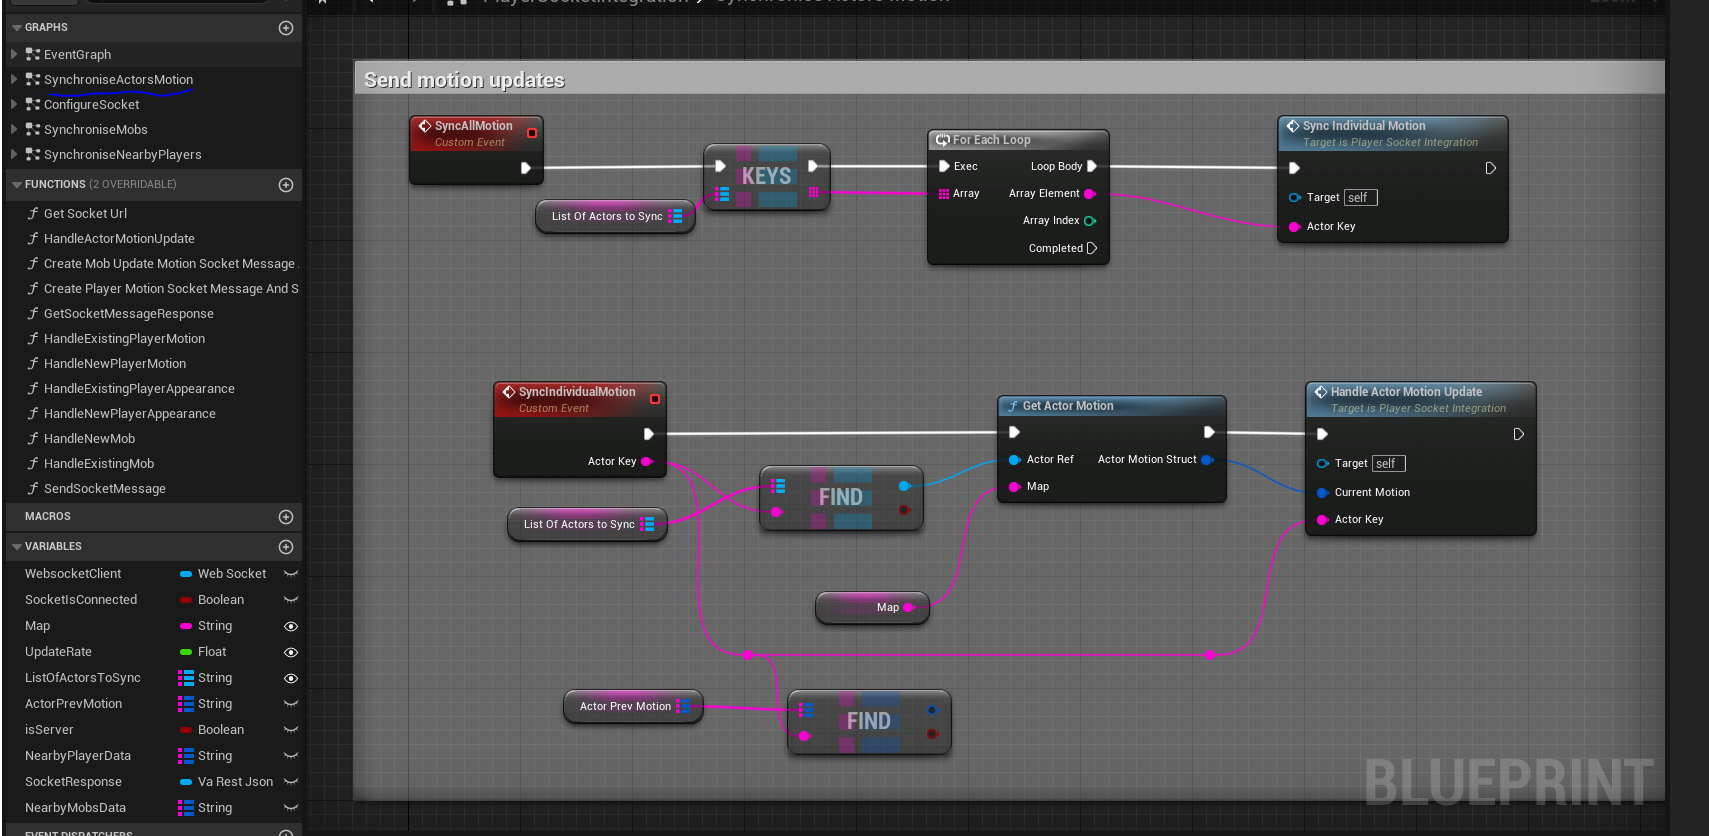
I wanted to keep this component generic and allow it to be used by the player character as well as the mob spawner.
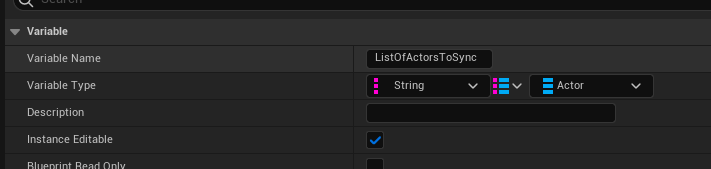
That’s why instead of singular actor, I support list of actors.
For players, this should just be the 1 actor at all times.
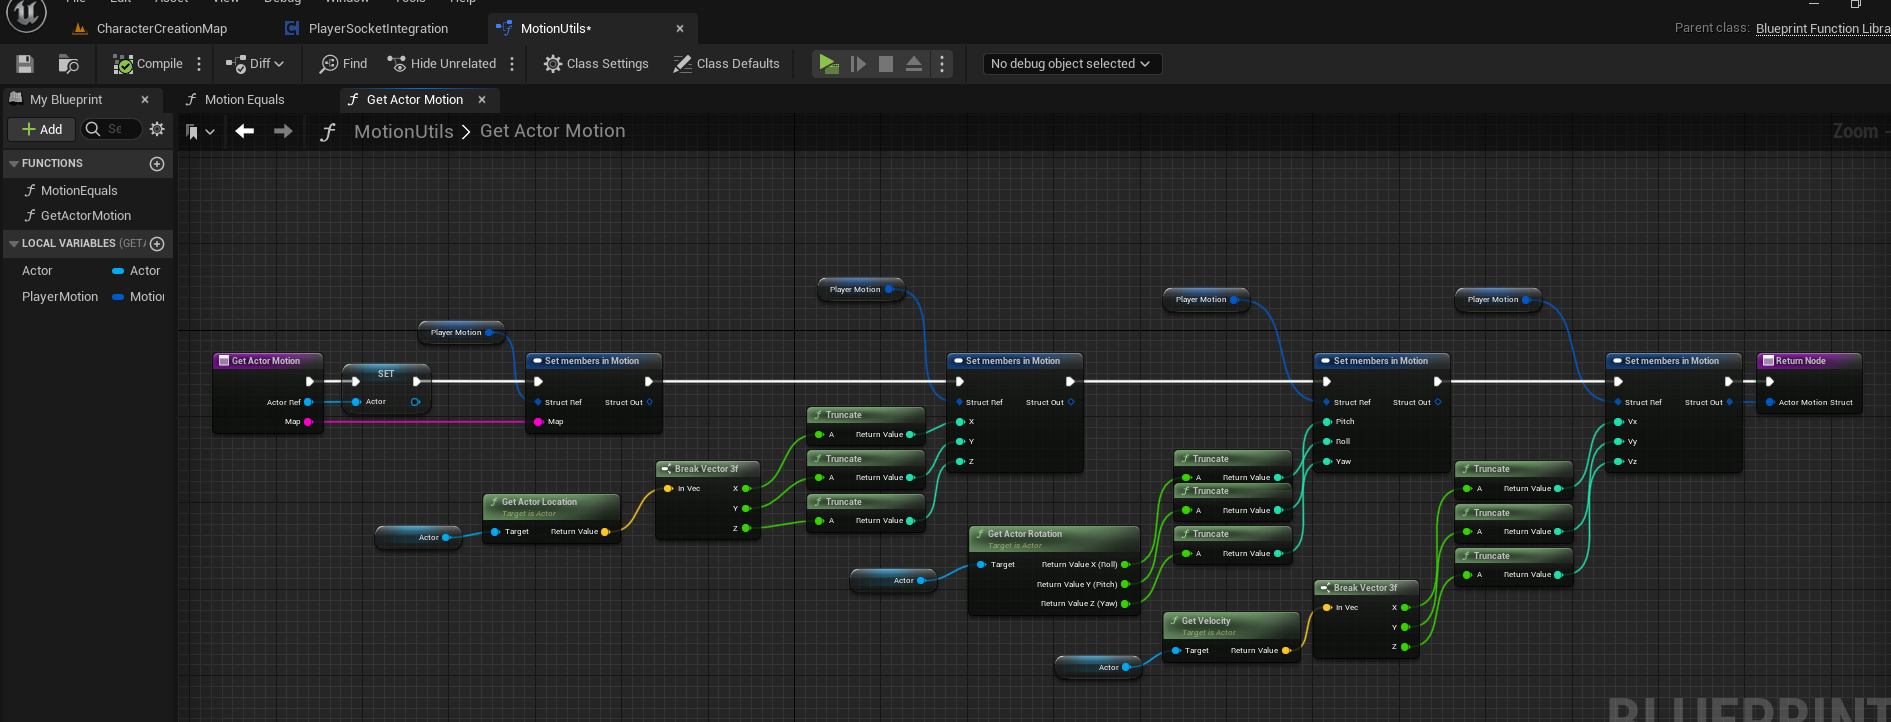
I then extract the motion details from the actor, I created a separate function for this which sits in the MotionUtils blueprint.
Feel free to keep it refactored or as a separate function in this blueprint, its definition is as follows:
Let’s now look at how we will send this motion information over to the server. Here’s Handle Actor Motion Update.
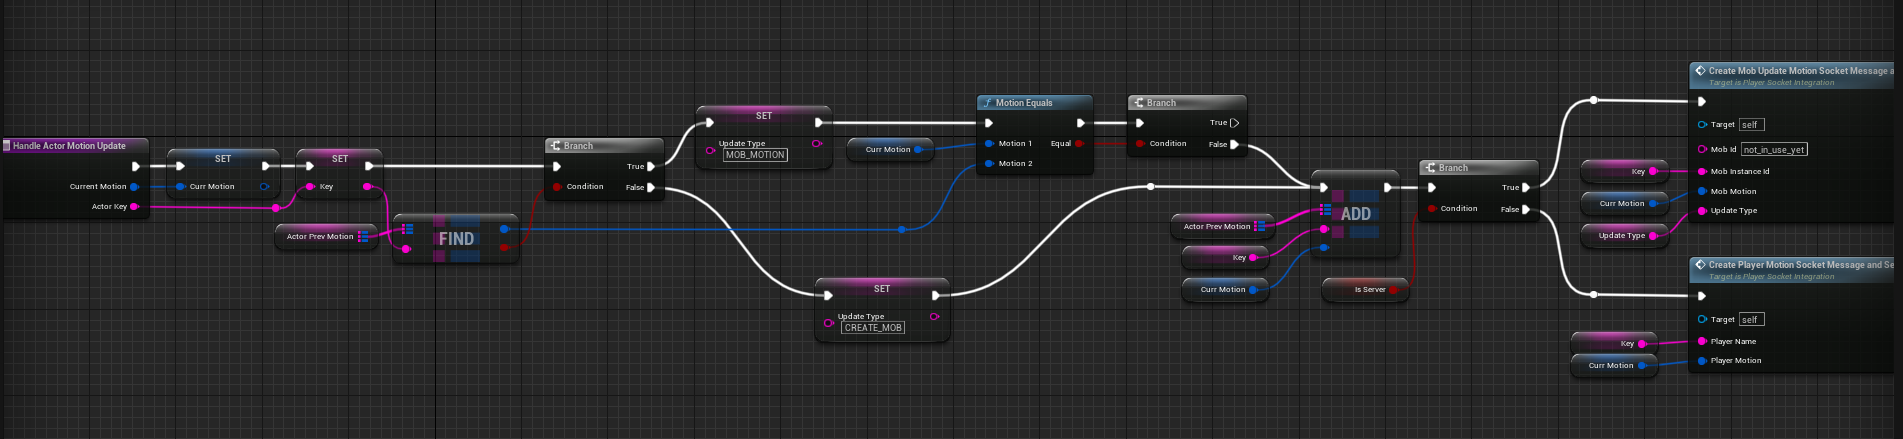
This function takes in the motion extracted from the actor. The key represents the actor identifier, for example either the players name or the mob instance id.
We track the previous motion from the players and mobs in the variable Actor Prev Motion.
First, we check if the previous motion for this actor exists. This distinction is currently important for server optimization; if its a new mob we want to create the mob, not just update its motion information. So this check is only useful for server part, not player. Therefore you can see the UpdateType variable is only connected on the branch where isServer is set to true.
Next, we check if Motion Equals when the previous motion exists. This is big performance optimization check. You don’t want to send data if it hasn’t changed.
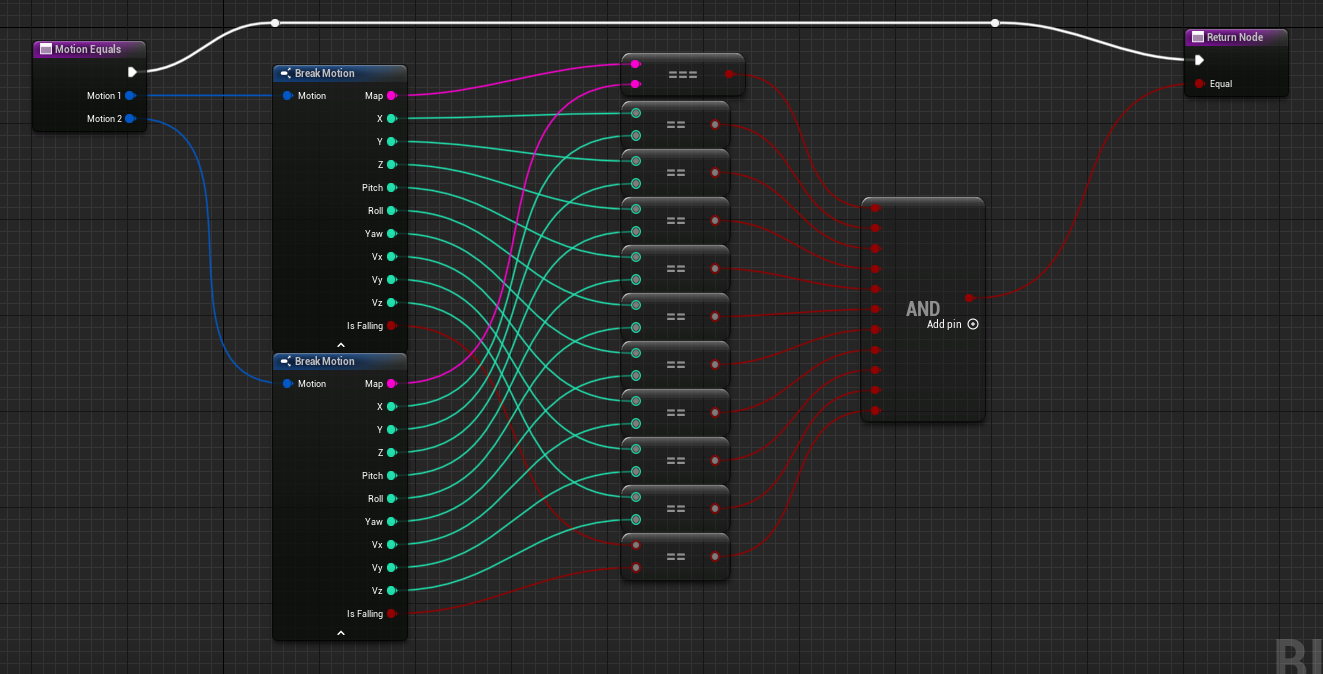
The definition for MotionEquals is as follows, simply checking the Motion struct.
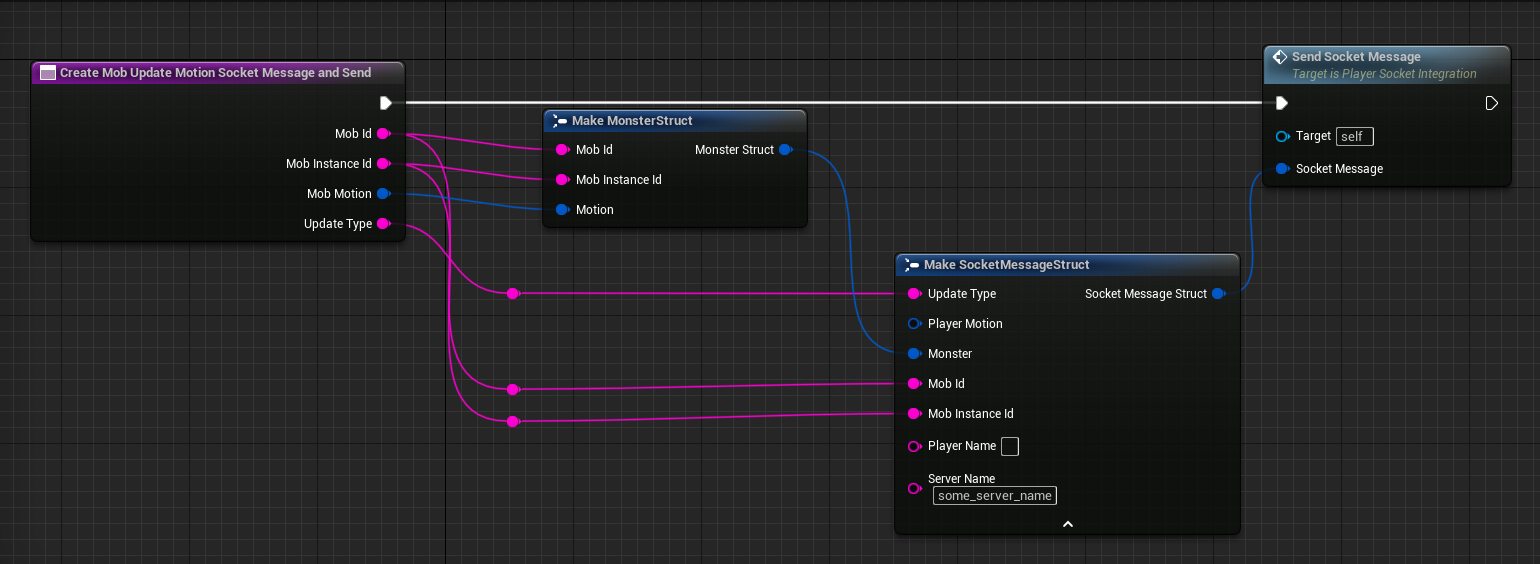
Next, we have Create Mob Update Motion Socket Message and Send:
And Create Player Motion Socket Message and send
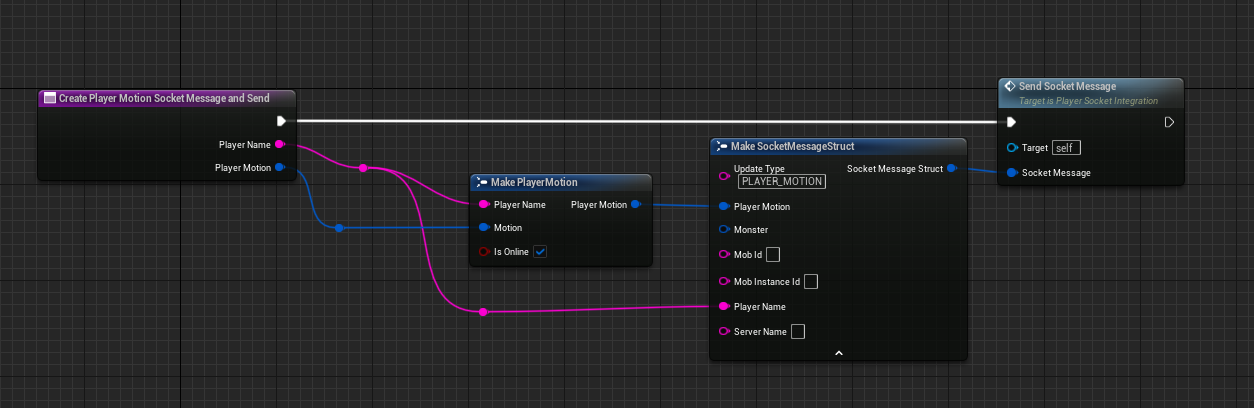
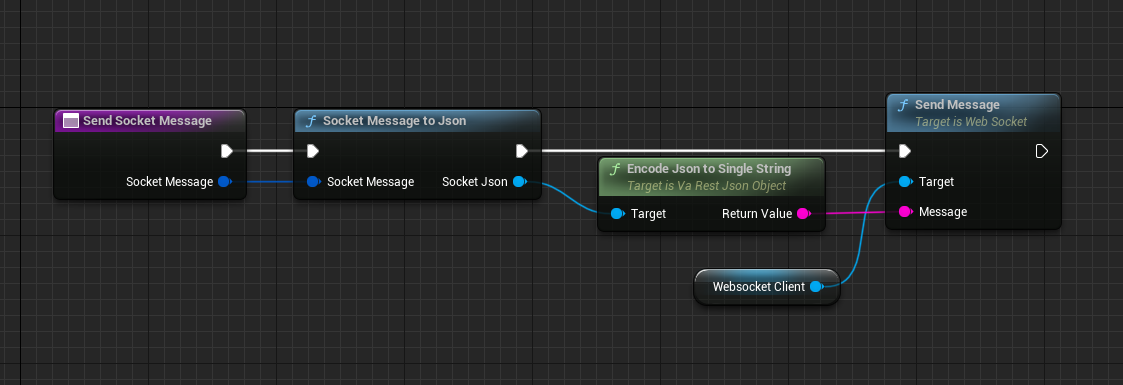
They’re both using this small function, Send Socket Message to send the message using the websocket.
As you can see, these functions are simply populating the required parts of our SocketMessageStruct for our server. The ‘isOnline’ boolean is redundant and perhaps will be removed from this struct.
If the message is player related, we’re populating the player motion parts of the message. If its server/mob related, we populate the mob update details. We always have to specify the Update Type for the server to process it correctly.
Note that Send Socket Message is leveraging VaRest Json library to serialize and de-serialize our structures. All this function does it takes our structure and converts it to a Json String. So any way you achieve it will be fine!
Serializing / De-serializing the struct
The serializer/de-serializer is still pretty tedious as its all manual (there are libraries in Java for example which do this automatically for you). As I’m writing this I check and there may be some assets from marketplace which will make this easier:

I haven’t tried them yet but perhaps in the near future!
For now, I am manually populating it like so:

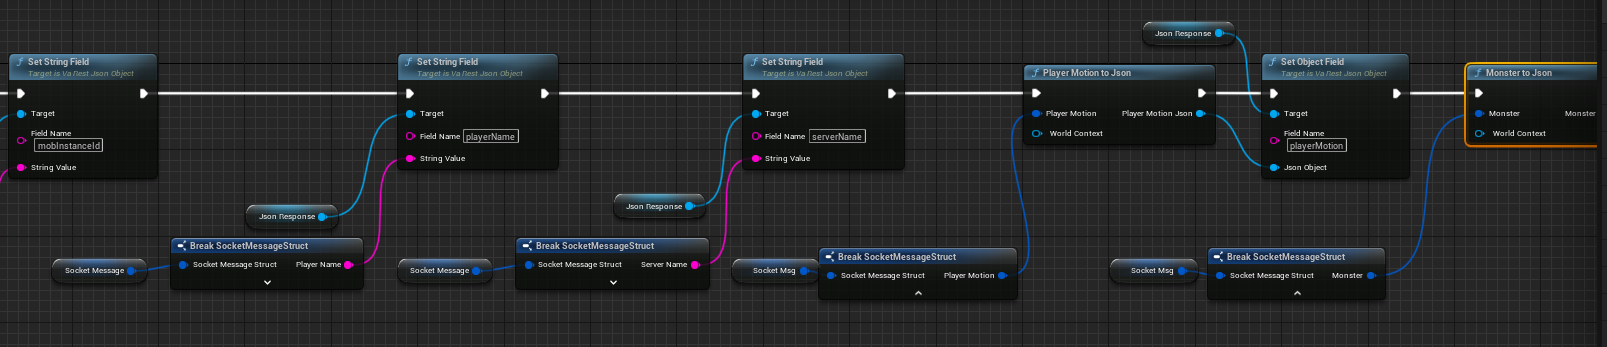
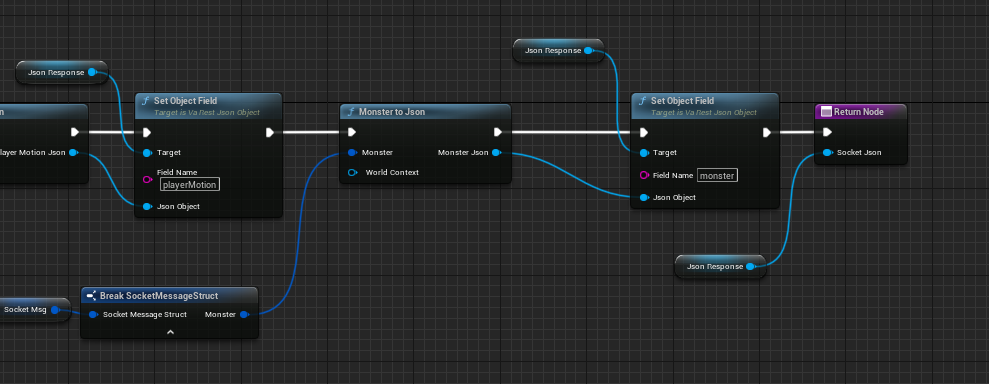
This is constructing the websocket message and its not even including the nested objects. I have a dedicated function library to help me with these serializers so you can see it takes me quite a bit of time. So perhaps one of those assets will be a great investment!
I will not go into too much detail about serialize/de-serialize because there are many different libraries which do similar things in slightly different ways. The main thing is that you want to convert your Struct into a json string and vice versa.
Synchronizing nearby players
Ok now we’ve started pushing data for players and mobs using this integration system.
What we want to do is start synchronizing responses, which can come at any time.
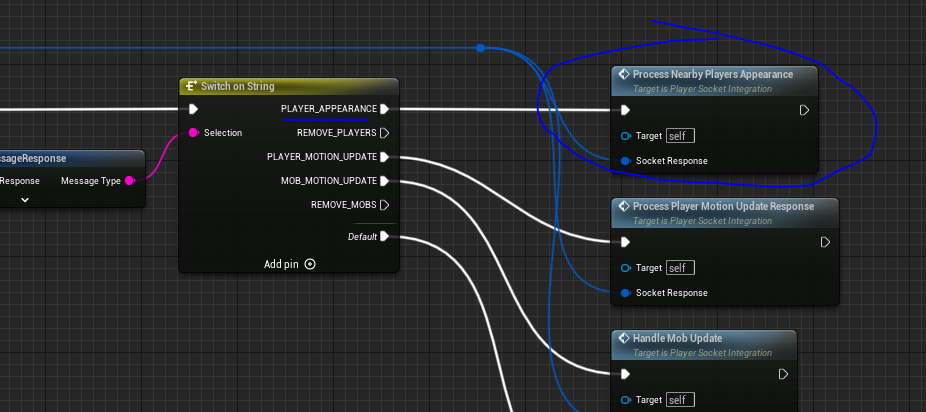
I will reference again the Bind on message received function that we looked at when we configured the socket.
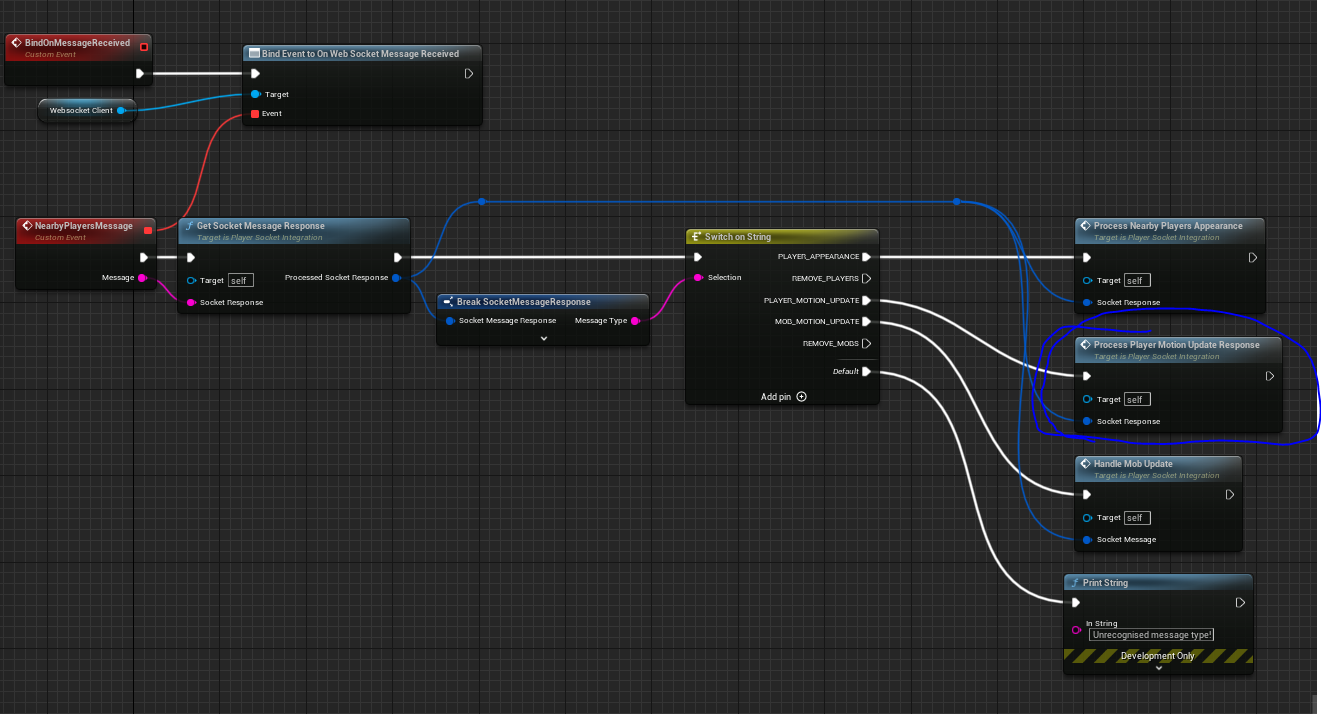
From here we will focus on messages which contain PLAYER_MOTION_UPDATE update type in the socket message response structure.
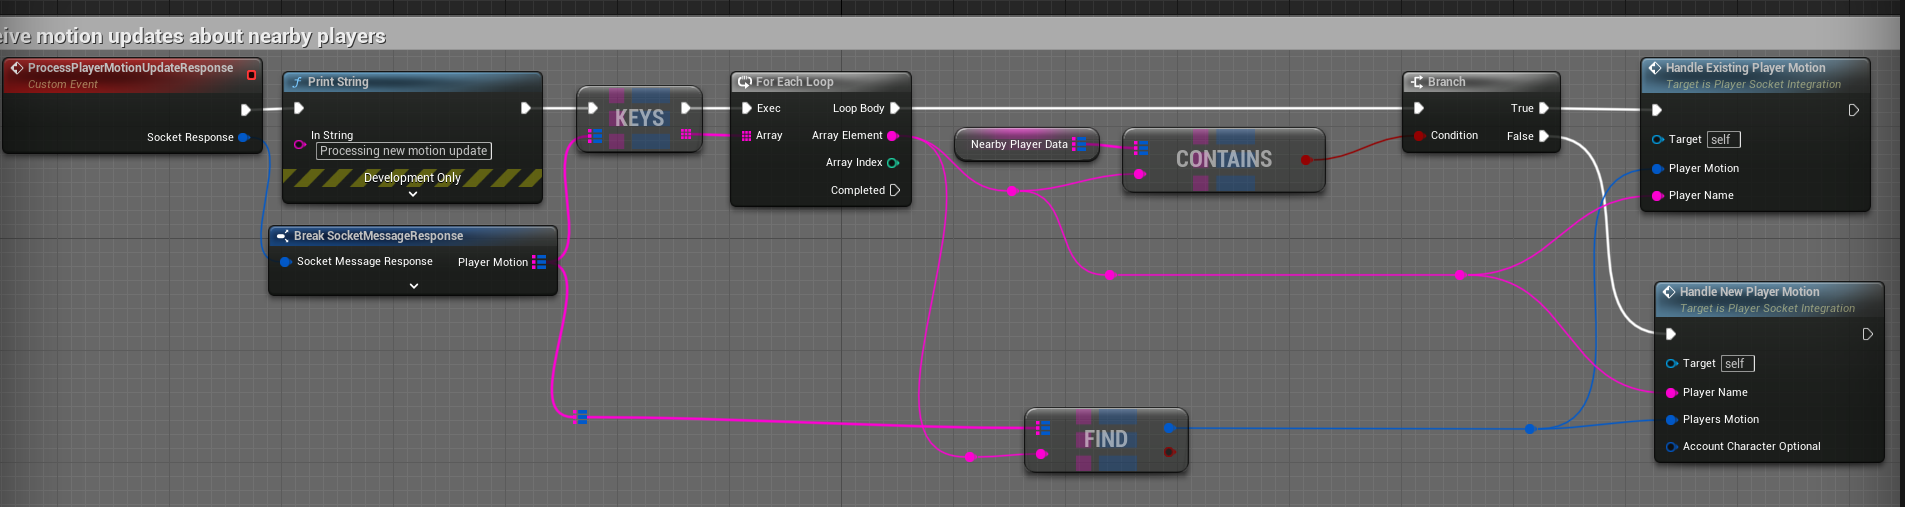
From the response we will get the player motion updates, this is a Map<String, PlayerMotion>. The String refers to the player name key. At this point, the server supports just sending 1 at a time, but I made the structure like this to allow it to support batch in the future.
The Nearby Player Data variable is a map where the key is the player name and the value is Character Data containing the following fields:
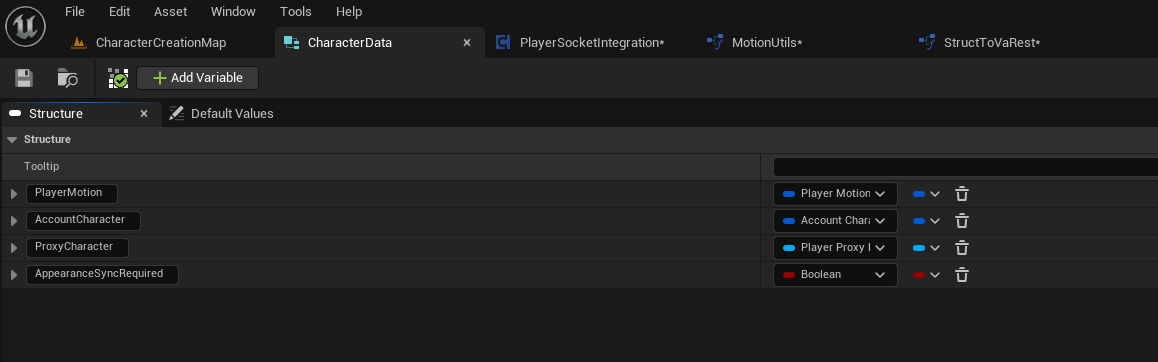
The Player Motion is the structure containing motion information, position, rotation, velocity, etc.
The Account Character field contains the appearance information for that character.
They come asynchronously and without the motion I can’t create the proxy character, so I also added AppearanceSyncRequired to make sure I sync the appearance if the data comes out of order.
The Proxy Character is basically the Actor component, representing other players in the game.
Let’s look at what we do when its a new character on the map:
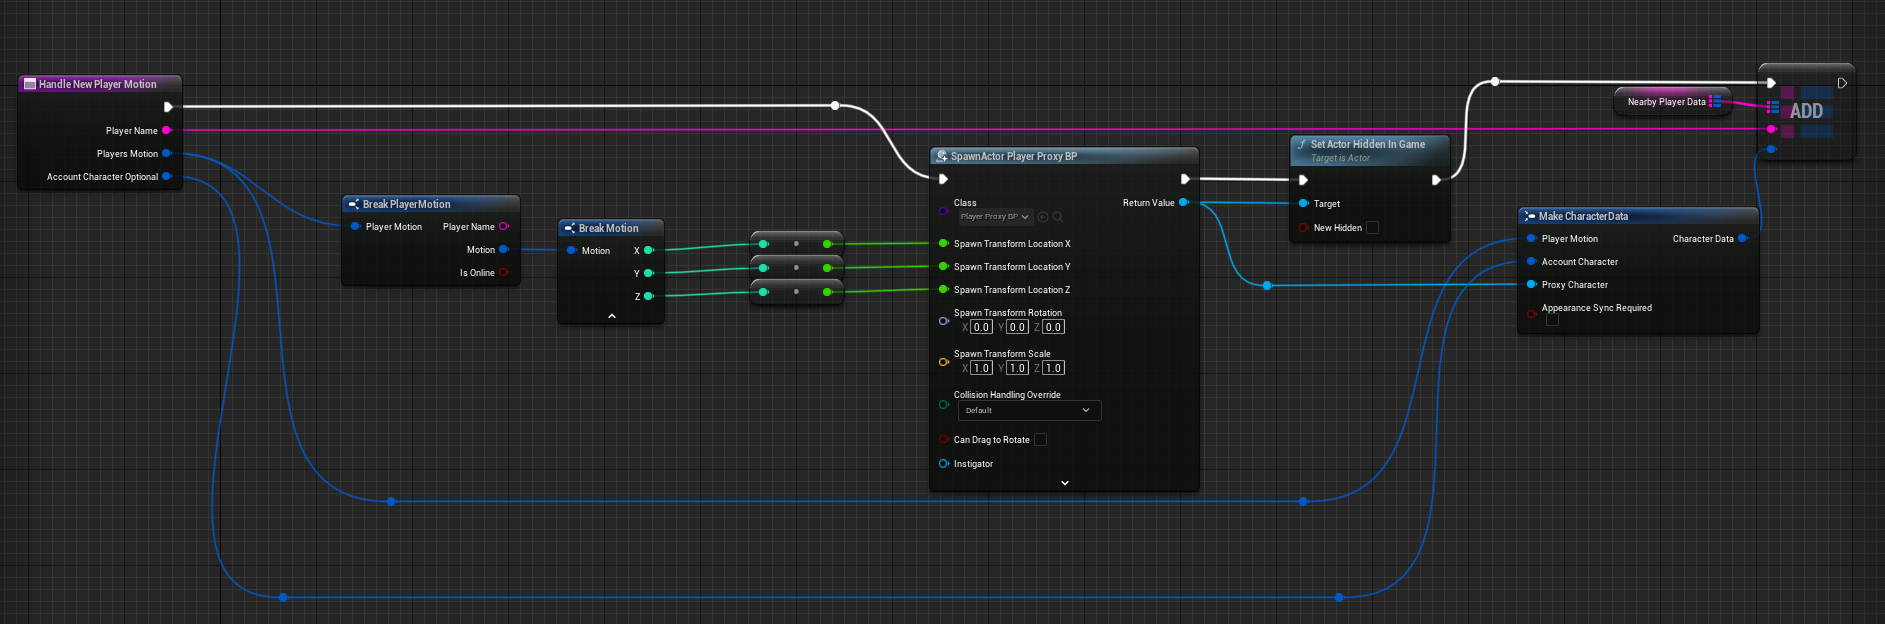
If its a new player, we spawn a new player proxy actor component and then we add all this new information into our Nearby Player Data variable.
What about if its existing player:
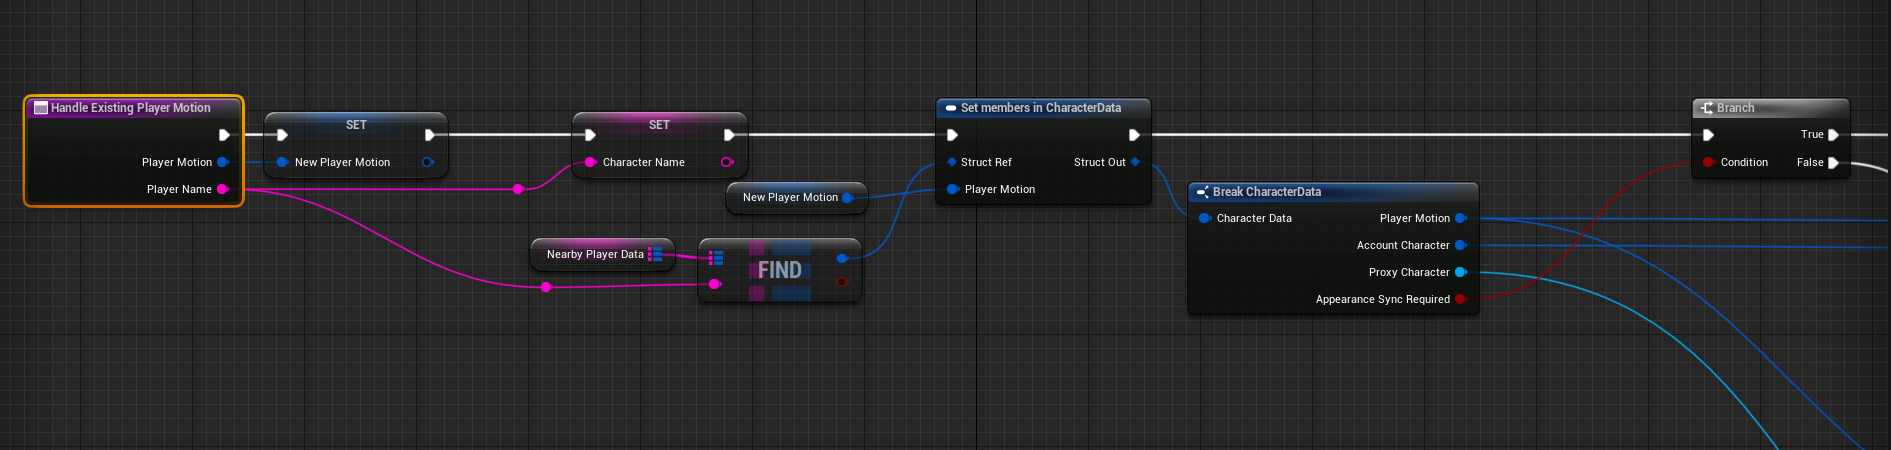
If the player motion exists in the Nearby Player Data variable, I merge the updates of the new motion (using Set members in Character Data). I check, is Appearance Sync required, if it is, that means we received appearance information before we got motion information, so the proxy was not spawned yet and so we didn’t synchronize its appearance yet.
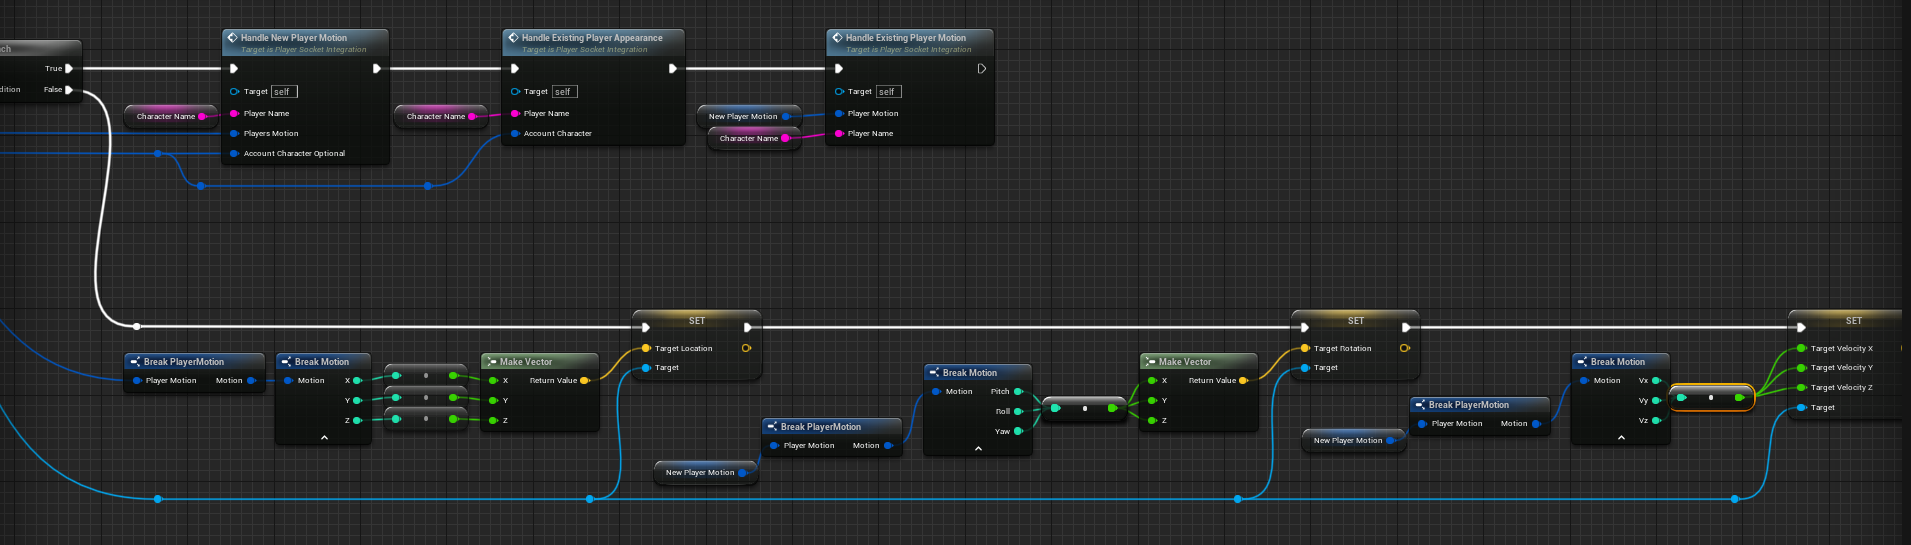
Therefore if the sync is required, it means we should execute Handle New Player Motion – this is to spawn the actor component for us and anything else that may have been missed. I then handle the existing player appearance, because the appearance information needs to be set on the actor component, and I pass the account character which was set from before (this will be covered soon).
I then call itself, but on next iteration the Appearance Sync Required boolean will be false so it will go into the bottom branch instead. This is a little less efficient, but it will do this only once per character spawned so its ok (as its a lot simpler to code in).
So on the bottom branch, what we do is take our motion structure and use it to update the actors target location, position and velocity. The actual processing of this information will be displayed in the next short post which covers actor smoothing. I will update the reference here when its ready.
Synchronizing nearby players appearance
In the above blueprints we see that the functions are updating the proxy characters motion information, namely position, rotation and velocity.
The appearance information would come with a separate async response. From our switch statement on the Message Type it is PLAYER_APPEARANCE.
This custom event follows a very similar dynamic to updating the motion.

Our message contains a Map of data, where the key is the players name and the value is the Account Character which contains the appearance information.
We just check whether the nearby player data already contains an entry – we looked at this in a bit of detail in the previous section. If the nearby player data contains this key, it means the actor has already been spawned (not visible yet). Therefore, we just need to update that actor with the required appearance information and ask it to synchronize.
If the nearby player does not contain this key, that means we need to store this data and ask it to process it once the actor has been spawned. We do this via Appearance Sync Required boolean – let’s see how we set it inside Handle New Player Appearance.
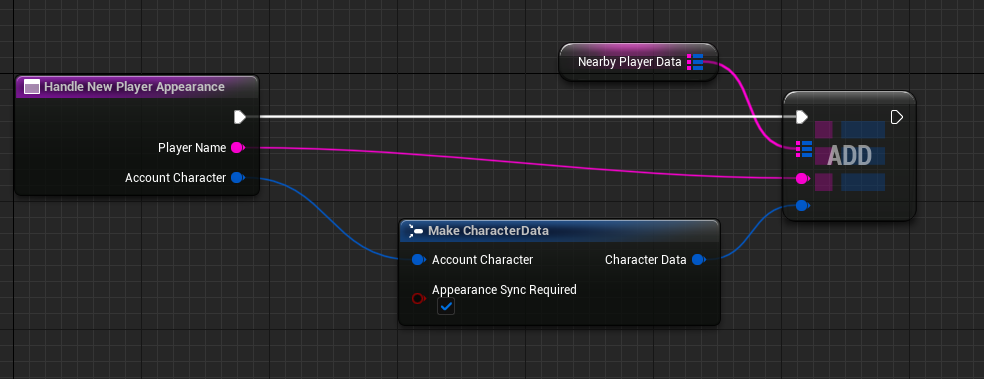
Pretty simple, we just store it for now indicating that we still need to sync this data with actor once its created.
Then let’s have a look at Handle Existing Player Appearance.

This means that the entry exists in Nearby Player Data and we can get access to our proxy character. We can therefore store the updated Account Character variable in the nearby player data and ask the proxy character reference to Resolve all appearance based on the data we provide. The resolving of appearance is fairly complicated and was handled part of character creation series, specifically post on applying options to meshes.
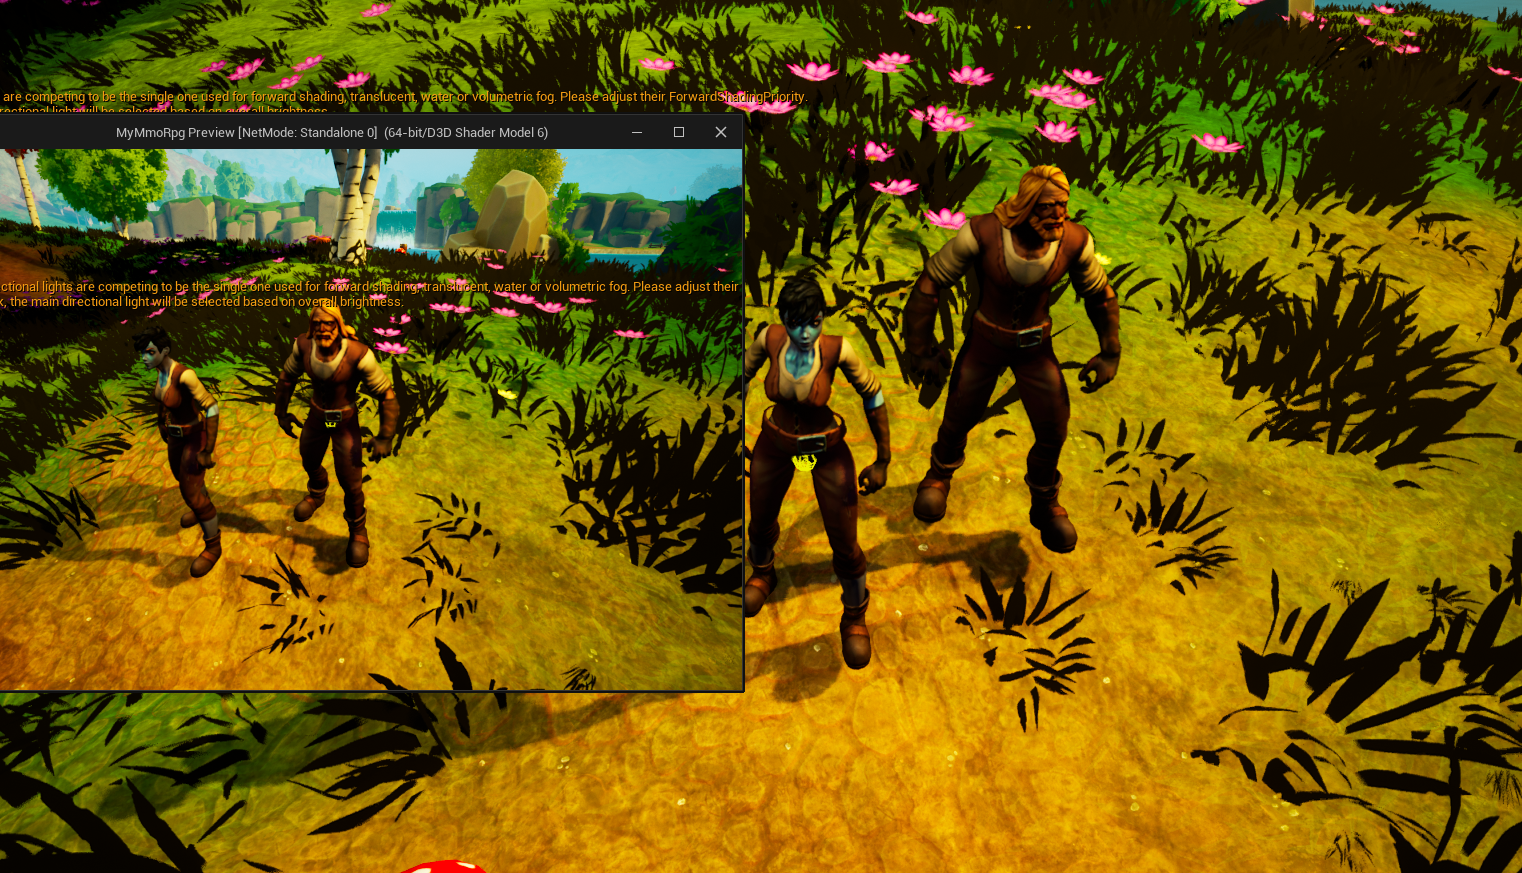
We now have some very basic test implemented between two characters which can interact in the map.
In the next two posts we will look at how to make the smoothing of the motion after its synchronized as well as how we can synchronize the mobs.