Rails and React – Single page application with Webpacker
Ok now you have your Ruby on Rails application, got all the basic pre-requisites completed and want to create a SPA with React.
If you missed how to get the basic rails setup, check out
As Rails is a MVC framework (Model View Controller) you will want to first create the root items first.
For Single page applications, you inevitably break some of this MVC structure – so we will create a Rails API back-end with React driven front-end. This is not a ‘vanilla’ approach to rails design, however I have seen these in practice and they have many advantages.
So let’s get into it.
Install dependencies
First of all, ensure all javascript dependencies are installed, run:
yarn installWe can now go ahead and create a simple root controller/view, similar to an ‘index’ controller/view, run:
rails g controller homepagechange ‘homepage’ to whatever you like – this will be the index controller that your rails will navigate to by default.
This should run like so:
rails g controller homepage
Running via Spring preloader in process 75118
create app/controllers/homepage_controller.rb
invoke erb
create app/views/homepage
invoke test_unit
create test/controllers/homepage_controller_test.rb
invoke helper
create app/helpers/homepage_helper.rb
invoke test_unit
invoke assets
invoke scss
create app/assets/stylesheets/homepage.scss
The created controller will come in empty, so we should create an index. Find your file and make it contain the following content:
class HomepageController < ApplicationController
def index
end
end
Now that you have a root controller, let’s add it to the routes.rb file:
Rails.application.routes.draw do
root ‘homepage#index’
end
This is not enough yet as we’re still missing the initial view. The controller generator created a folder for the views app/views/homepage but there is no view.
We created a index call in our controller and referenced it in routes.rb so now we should create a corresponding view, go ahead and create a new file:
app/views/homepage/index.html.rb
and put inside it
Hello world
If you leave that as the only content, then execute
rails s
and navigate to localhost:3000
You should now be able to see this:
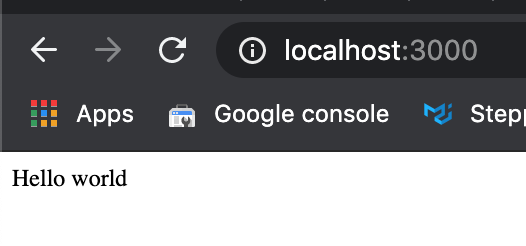
With this, we know that routes.rb is correctly pointing to the new controller and function in homepage.rb and loading the correct view.
You can now go ahead and delete the ‘Hello world’ line from index.html.erb. This file can now remain empty.
Create your first ‘React’ component
Lets use rails to help us install and initialise react:
rails webpacker:install:react
This does a really nice thing of creating a file for us to get started with (as well as several other useful things)
app/javascript/packs/hello_react.jsx
There’s a useful comment on top of it saying to add
<%= javascript_pack_tag ‘hello_react’ %>
to the head of your application file.
Let’s do that, navigate to app/views/layouts/application.html.erb and add this, it will then look like so:
<!DOCTYPE html>
<html>
<head>
<title>Railscruiter</title>
<%= csrf_meta_tags %>
<%= csp_meta_tag %>
<%= stylesheet_link_tag ‘application’, media: ‘all’, ‘data-turbolinks-track’: ‘reload’ %>
<%= javascript_pack_tag ‘application’, ‘data-turbolinks-track’: ‘reload’ %>
<%= javascript_pack_tag ‘hello_react’ %>
</head>
<body>
<%= yield %>
</body>
</html>
With this in place, if you now execute
rails s
and navigate to localhost:3000 you will see the following
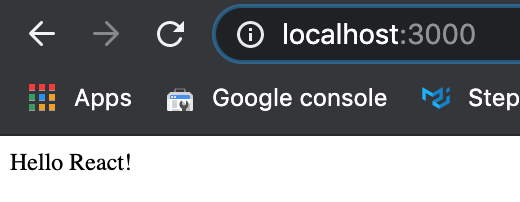
If so, great! You now have a working system of ruby on rails hooked up with React.
In the next chapters we will look at installing some nice react UI components and creating rails restful APIs and integrating them all together.